Import from REST API
You can import data from REST API sources that return JSON, XML, or CSV data. Data import is similar to Excel and CSV file upload, but you do not need to export source data to a file and upload it to eazyBI. In addition, you can schedule regular daily imports from the provided REST API data source.
Please first read about eazyBI cubes, dimensions, and measures - you will need to understand the multi-dimensional data model to be able to map source file columns to cube dimensions and measures.
In this tutorial, we will use the GitHub issues REST API data source as an example.
On this page:
Create new source application
Go to Source Data tab and Add new source application and select REST API application type.

If you have already created another similar REST API data source, then you can export its definition and paste it into the Import definition to create a new REST API source application with the same parameters.
REST API source parameters
In the next step, you will need to provide REST API source parameters, which will be used to retrieve the data.
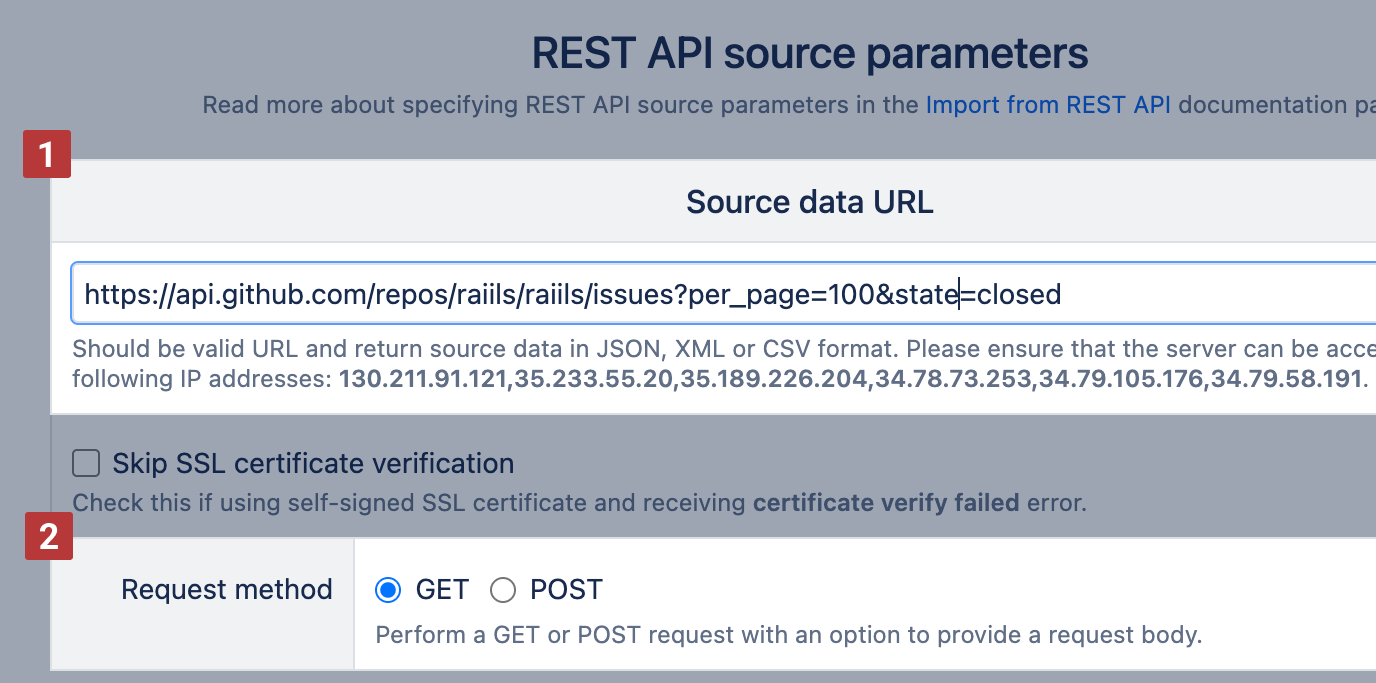
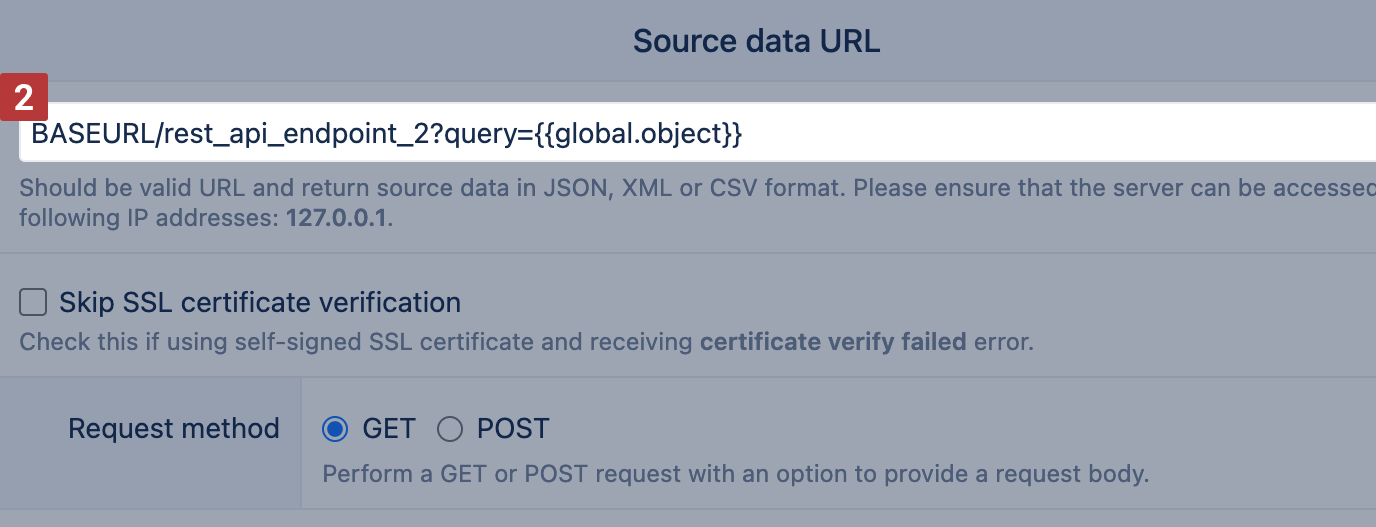
Source data URL
In Source data URL [1] provide REST API URL which returns the data. In this example, we are using GitHub issues REST API to get all issues from https://github.com/rails/rails/issues. In addition, we have added parameters per_page=100 (to indicate that we want to get 100 issues per page) and state=closed to indicate that we want to get just closed issues. Select the REST API request method [2] used by the particular endpoint. The GitHub issue request uses GET.
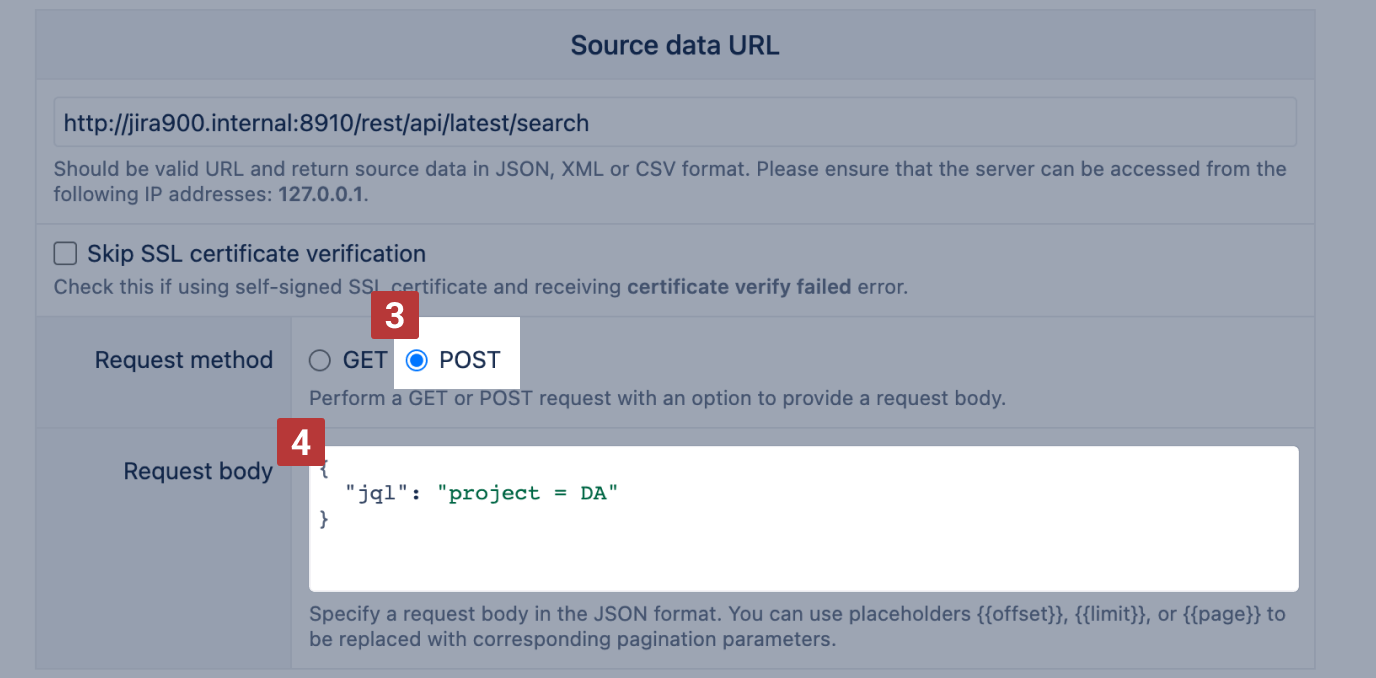
The Jira search API supports both GET and POST methods. For POST [3] method, you can specify request options in the request body [4] :
IP allowlist in Jira
If your organization uses restrictive firewall or proxy server settings, you or your network administrator may need to allowlist certain domains and IP address ranges for eazyBI app.
- 130.211.91.121
- 35.233.55.20
- 35.189.226.204
- 34.78.73.253
- 34.79.105.176
- 34.79.58.191
Pagination parameters
In Pagination parameters specify if you can get all data just with one request or you need to make many requests to get all result pages.
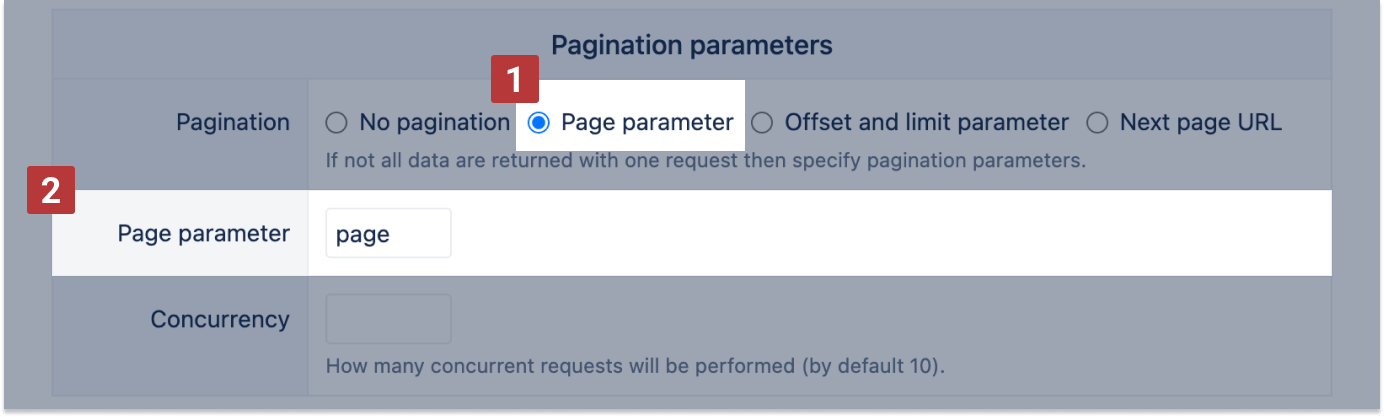
Page parameter
In Page parameter [1] specify the additional page parameter [2] to get all pages (it will add parameters page=1, page=2, ... and so on to get all result pages. If page size can be specified as a parameter then add it in URL input (as we already provided per_page=100 in this example).
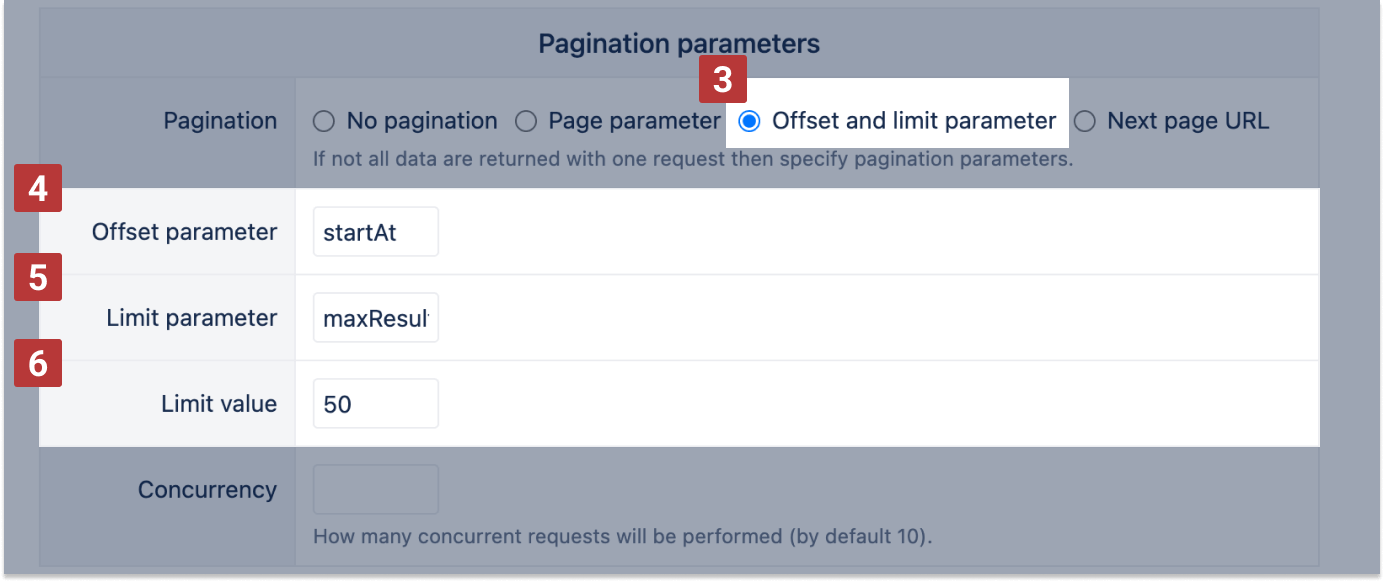
Offset and limit
Use Offset and limit parameter [3] if all pages can be retrieved using parameters e.g. offset=0 and limit=100, offset=100 and limit=100, ... and so on. For example, the Jira Server REST API uses the startAt parameter as offset [4] and maxResults as limit [5]. Specify the limit in limit value [6].
With the POST request method, you have the option to specify the pagination parameters in the request body. See an example with offset and limit parameters specified there.

It is recommended to use page or offset and limit parameters if possible as it will enable concurrent REST API requests and will make the import faster. By default, up to 10 concurrent REST API requests will be made simultaneously. You can adjust the maximum number of concurrent requests using the Concurrency parameter (for example, reduce it if too many concurrent requests are causing errors in the source application).
Next page URL
In Next page URL [1] specify a path to a JSON results property which contains the URL of the next page. For example, if REST API uses the HAL convention for specifying the next page URL then enter _links.next.href.
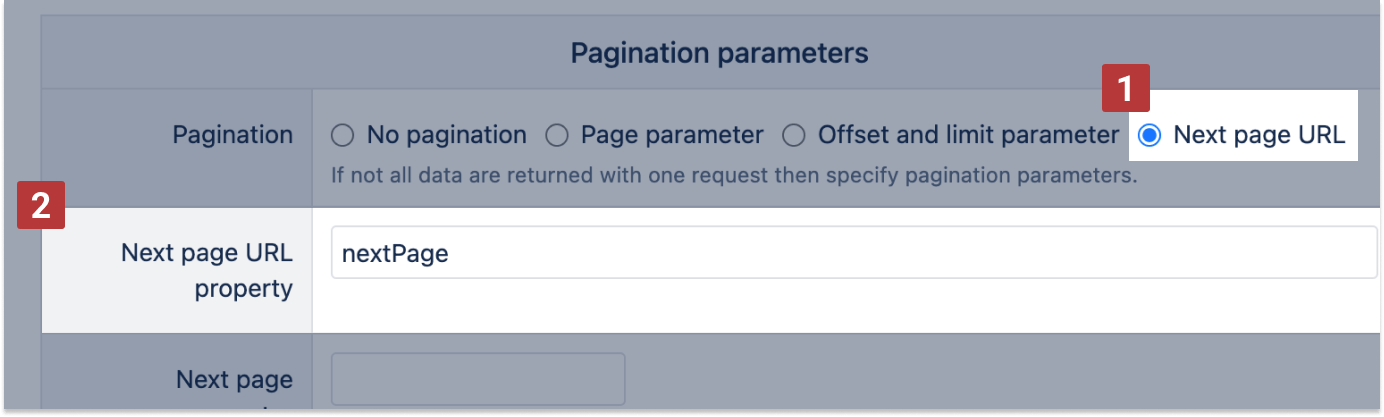
If the [2] property is not specified, then the Link header of the HTTP response will be checked to see if it contains a URL with the attribute rel="next".
On Cloud and since eazyBI version 8.1. you can use the dynamic formula for the Next page URL property, for example, ={{_links.context}}{{_links.next}} to access the results on next page
Cursor based pagination
REST API can uses cursor-based pagination with the Next page parameter [4] field located under the Next page URL option. If the value of the provided key is present in the response, the next page will be requested using the parameter value.
For POST requests, it's possible to provide a path expression where to find the next page parameter, for example, meta.issues.jql.nextPageToken. In the request body [3], use placeholder {{next_page}} where to put the returned next page parameter value, for example:
"context": {
  "issues": {
    "jql": {
      "nextPageToken": {{next_page}}
    }
  }
}

On Cloud you can retrieve the next page link from the cursor parameter in GET requests
For GET requests with a link to the next page of results included in the JSON, you can use the cursor parameters to set a specific starting point for the results. In the Next page parameter [7], assign the JSON path to the next page link to the cursor in the following format cursor={{path.to.nextlink}}, for example cursor={{links.next}}.

Authentication
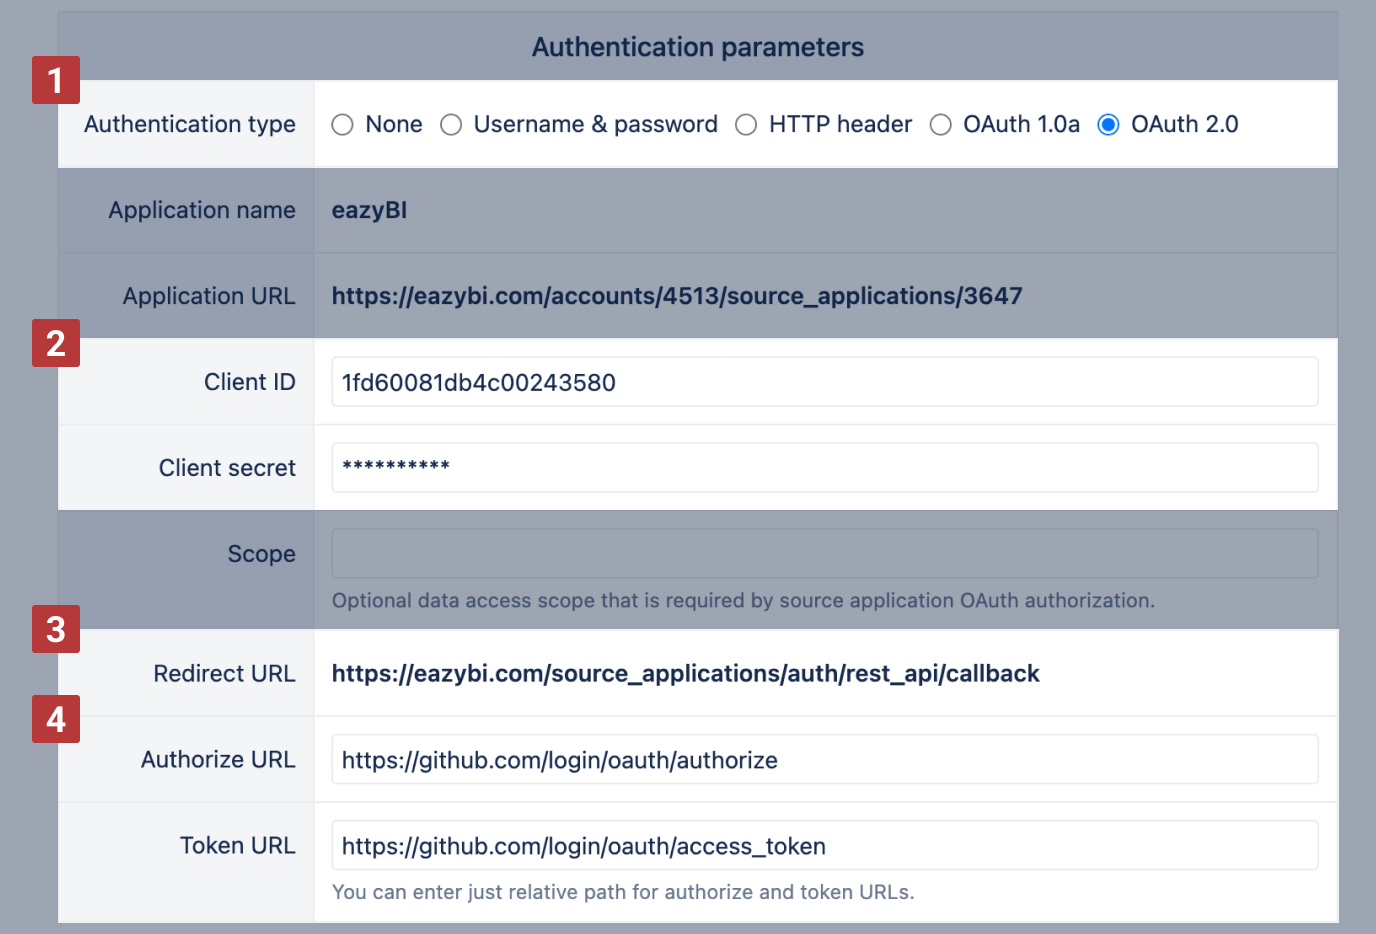
Next, we need to specify if and how the requests should be authenticated in Authentication parameters [1]. You can use simple Basic authentication and provide username and password or specify authentication HTTP header name and value, as well as use OAuth 1.0a or OAuth 2.0 authentication. If you need to use OAuth authentication then typically you will need to register eazyBI as consumer / client in the provider application.
For HTTP header authentication, please be aware of encoded values that are required for authorization.
In the following example, GitHub uses OAuth 2.0 for its REST API authentication.
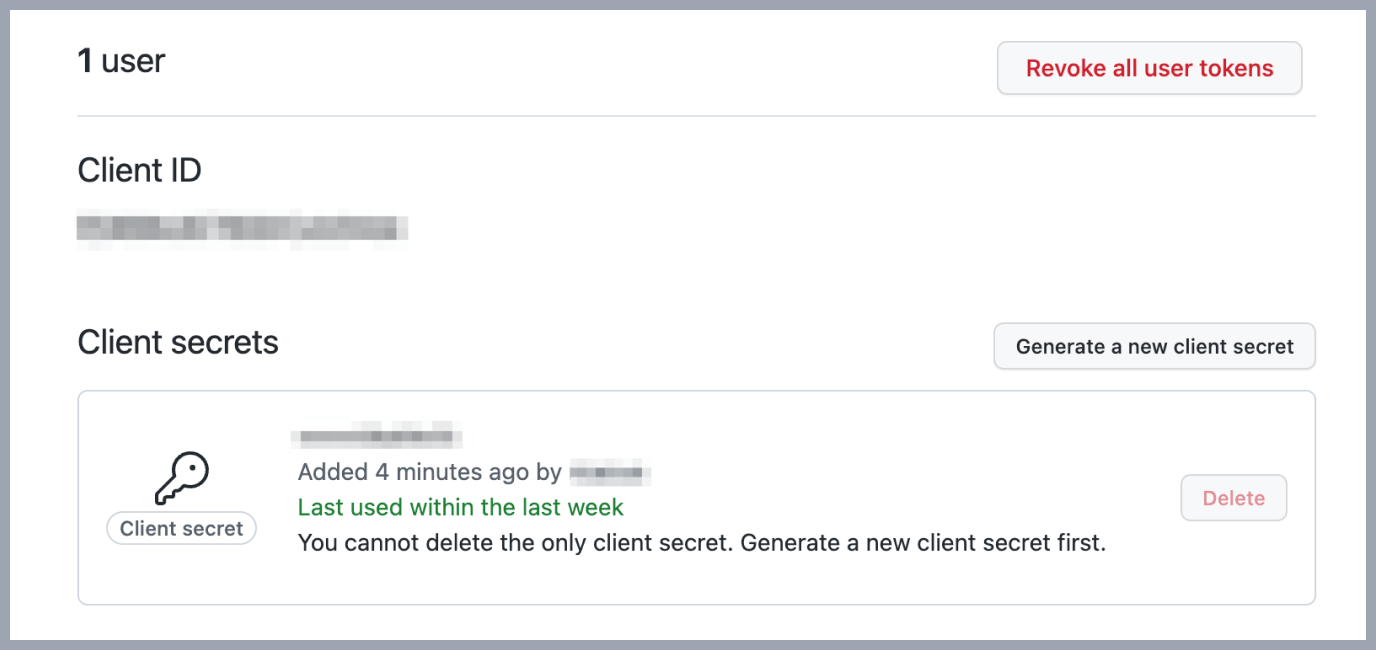
At first, we need to register the eazyBI application in our GitHub account settings / Applications:

Please specify there Authorization callback URL as Redirect URL [3] that you see in eazyBI REST API source parameters page.
After registration you will get your application Client ID and Client Secret [2] - please paste them in eazyBI REST API source parameters page corresponding fields.
If you will create several REST API sources in your eazyBI account that all retrieve data from the same source site (GitHub in this example) then you can use the same Client ID and Client Secret for all these REST API sources.
Please enter Authorize URL and Token URL [4] parameters according to REST API source OAuth authentication documentation (in case of GitHub OAuth implementation they are https://github.com/login/oauth/authorize and https://github.com/login/oauth/access_token.
Incremental import
By default, REST API import will always re-import all data. During the import, the old imported Measures data will be deleted and then replaced by newly returned Measures data. Dimension members will be updated and new Dimension members added. Note that old Dimension members are not deleted. If REST API returns many pages of results then each data import might take long time as well as reports might return incomplete data while the old data are deleted and not all new data are imported.
If REST API supports additional parameters to return just the recently updated data then you can use the incremental import option to update just the recent source data after the initial full import. Click Incremental import parameters to specify additional parameters.
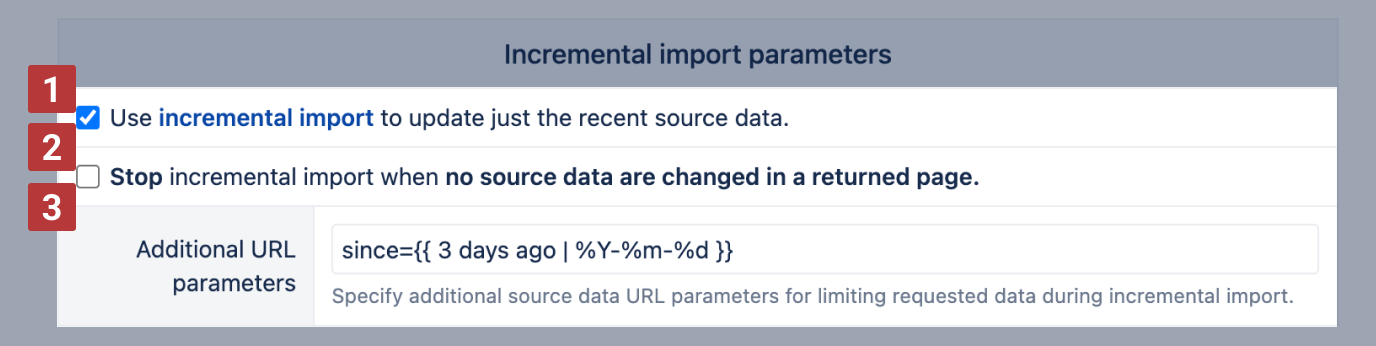
- Select Use incremental import to enable it [1].
- If REST API does not provide parameters for selecting just the recent updated data then you can use the option "Stop incremental import when no source data are changed in a returned page" [2]. If during the import some REST API results page will have all the same data that have been imported before then the import will be stopped. But please be aware that if data are changed when stored in eazyBI (e.g. decimal numbers are truncated when stored) then the source data page will not be exactly the same as in eazyBI.
Therefore it is recommended to specify Additional URL parameters [3] to limit just the recently updated source data. Typically you need to specify a URL date parameter that limits results to recently updated source data.
For example, in our GitHub issues example REST API hassinceparameter to return only issues updated at or after the specified date and time. We can use the following additional URL parameter:since={{ 3 days ago | %Y-%m-%d }}This will dynamically get a relative date and time 3 days ago and will format it using a strftime format string %Y-%m-%d (see available strftime format options). The following relative time units can be used – years, months, weeks, days, hours, minutes, seconds. And instead of ago also from now can be used to get a date and time in future.
If incremental import is used then it will be required to specify a Source ID column in the source columns mapping step. Source ID column value should provide a unique results row identifier. It is used to identify when some existing imported rows in eazyBI should be replaced with updated source data during the incremental import.
If you have previously imported all data without the incremental import option, then it will not be possible to modify the source columns mapping. Therefore, at first delete all imported data for this REST API source, and then modify the source columns mapping and specify the Source ID column.
If REST API does not return a column that could be used as a unique Source ID column, then you can use a custom JavaScript code to create a new doc property that could be used as a unique identifier – e.g. concatenate values of several other properties that will create a unique identifier for a row.
Content parameters
Specify whether the REST API will return JSON, XML, or CSV [1].
In case of JSON, you can specify the Data path using JSONPath expression, which returns a JSON array of objects that we want to import into eazyBI [2]. This is necessary if the REST API returns a more complex object and the array of data for import is in some lower-level JSON attribute. Similarly, in the case of XML, you can specify an XPath expression that returns a list of XML nodes to import into eazyBI.
In our GitHub issues example, we do not need to provide a JSONPath expression, as the REST API returns a simple array of issue objects. Click Continue to proceed to the next step, or Add custom JavaScript code [4] to modify the received information.
If your REST API source application returns JSON with a prefix, you can enter the prefix that must be removed from the JSON results [3].
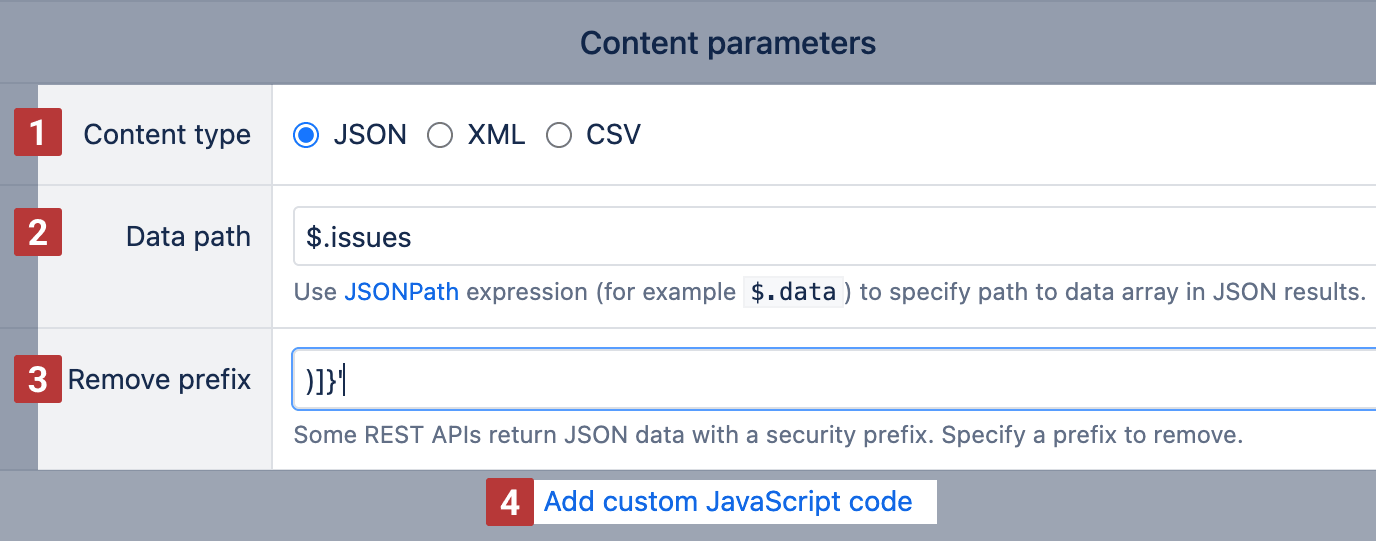
"Remove prefix" feature is supported only on eazyBI for Jira Cloud.
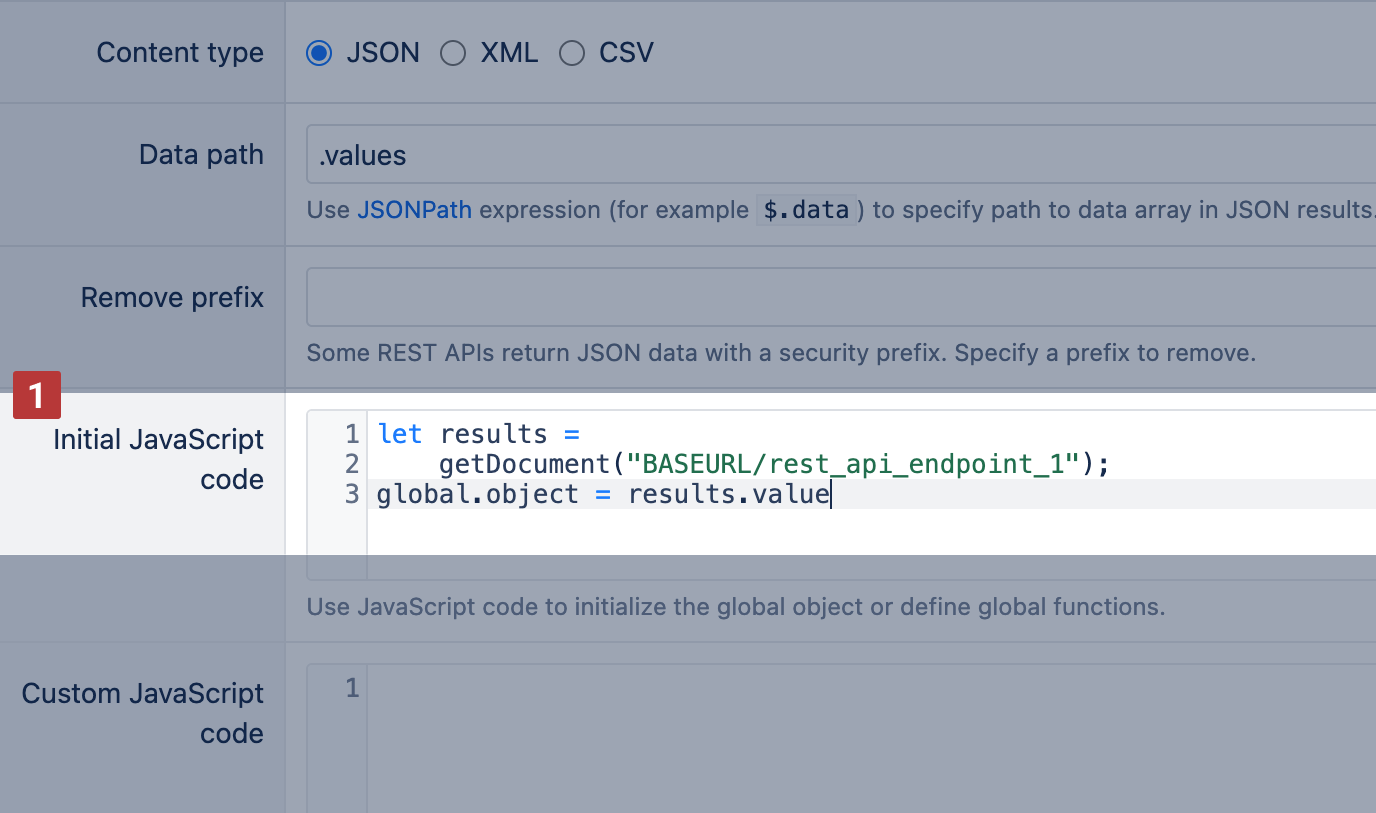
Initial JavaScript code
Initial JavaScript code available on Cloud and since eazyBI version 8.1.
This feature allows accessing data from more complex and non-standard requests beyond the HAL convention.
The initial JavaScript code is evaluated before making the main REST API request. It allows:
Defining custom function definitions for reusable functions.
- Fetching proxy data from other endpoints. For example, to initiate an async process, the ID can be retrieved for later usage in the main request.
Defining can be saved in the provided global object
When employing templating in the URL, Additional Headers, and Request Body, all objects stored in the global object are accessible. The user can use values computed in the initial JavaScript.
Some special properties are available to handle special cases. global.pagination.firstPage and global.pagination.lastPage are used to set the first and last page.
For example, you can define global.object from one [1] Rest API endpoint, and use it inside a query parameter for a different Rest API endpoint [2].
Custom JavaScript code
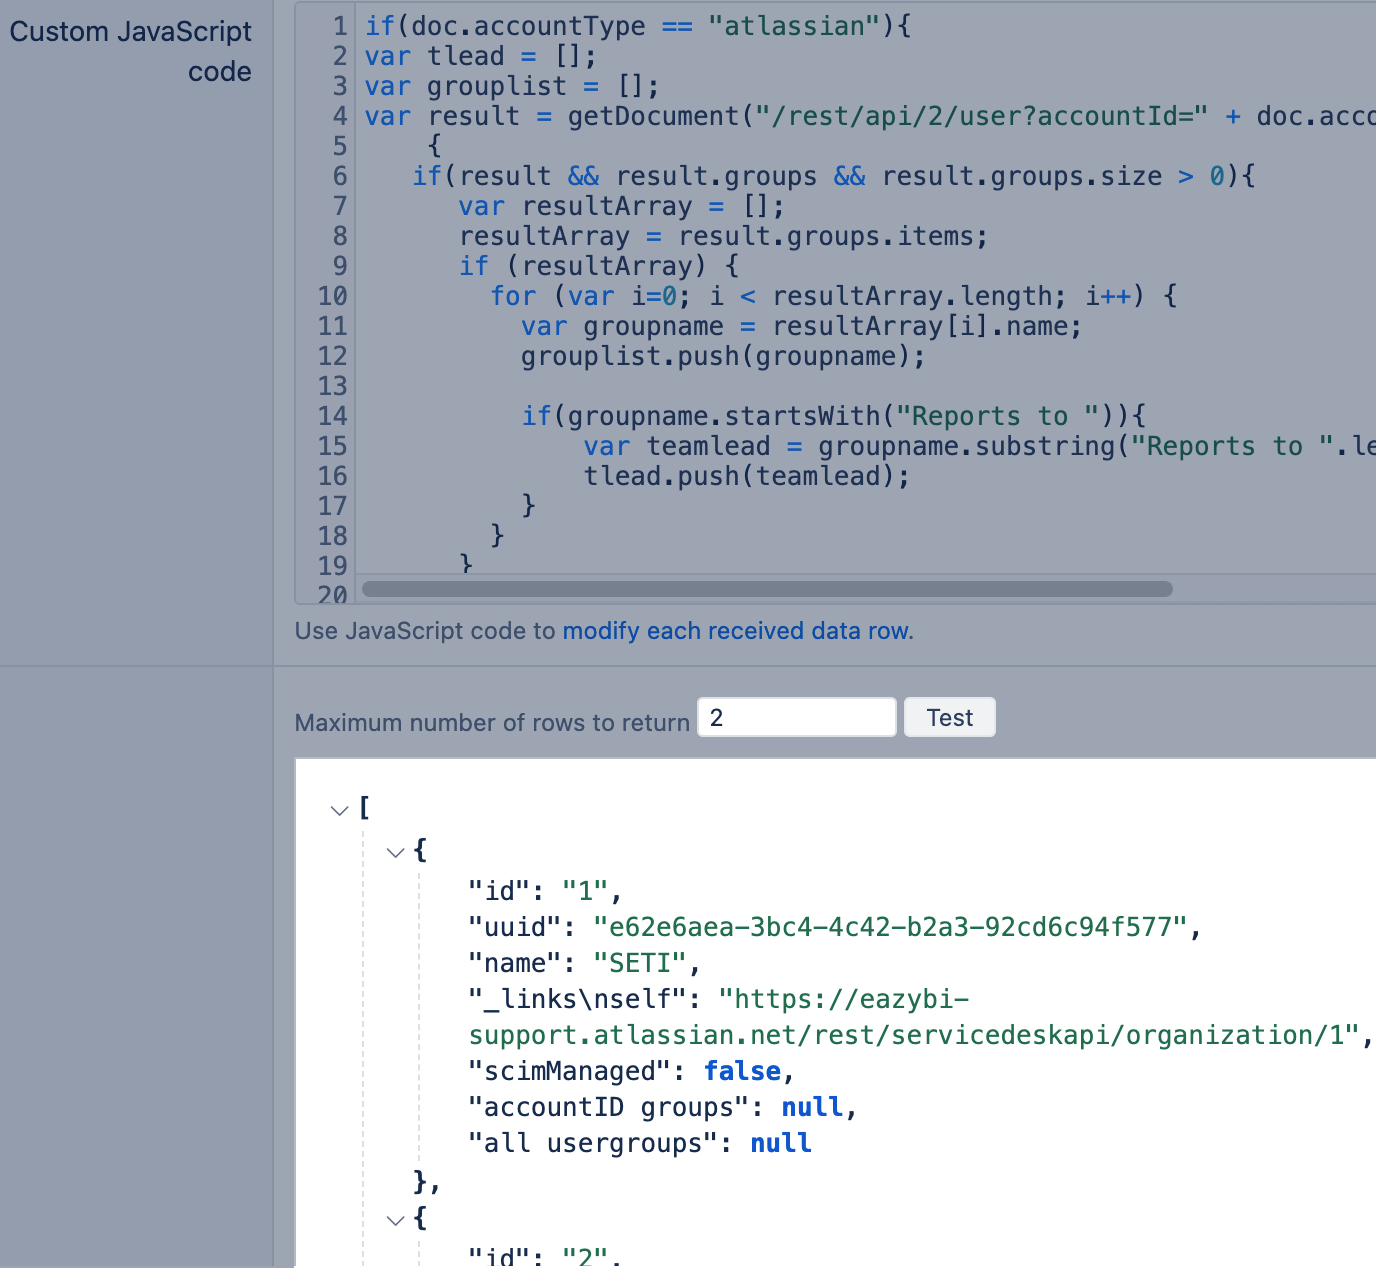
You can use custom JavaScript code to modify received JSON, XML or CSV data before importing into eazyBI. Click Add custom JavaScript code to show code editor.
You can use the doc variable to access received data object properties and modify or add additional properties. If necessary, you can define additional JavaScript functions that you need to use in your code.
Here is an example of JavaScript code that will change title property to a capitalized version (the first capital letter and then lowercase letters):
function capitalize(s) {
  return s.charAt(0).toUpperCase() + s.slice(1).toLowerCase();
}
doc.title = capitalize(doc.title);
If you would like to skip some data rows and do not import them in eazyBI then use return false; in these cases. Here is an example that will skip data rows that do not have title property:
if (!doc.title) return false;
You can also create new properties for the doc object when constructing eazyBI dimension level names or calculating additional measures. Here is an example of how to create full_name property:
doc.full_name = doc.first_name + " " + doc.last_name;
Here is an example of how to create a measure that counts data source rows (returns value 1 for each row):
doc.count = 1;
You can map one source data row to multiple data rows that should be imported into eazyBI. For example, if doc is an invoice object with several lines.
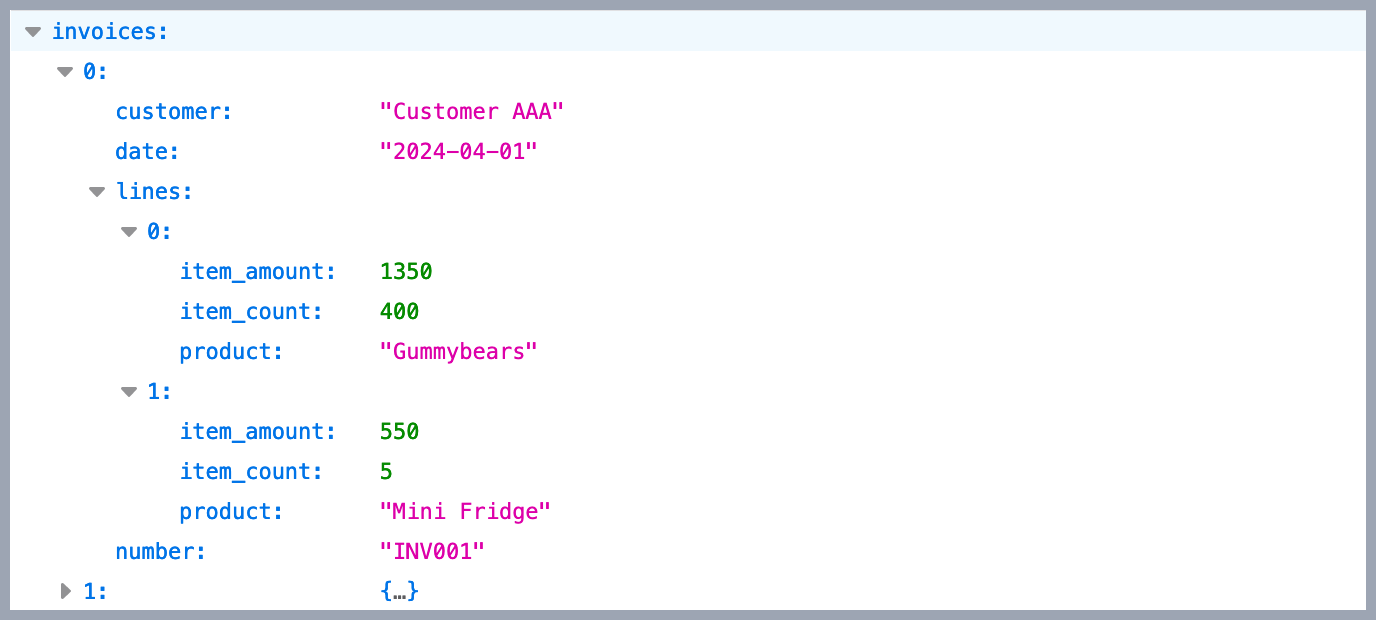
Then you can return an array of invoice lines that contain both invoice and line attributes:
return _.map(doc.lines, function(line) {
  return {
    invoice_number: doc.number,
    invoice_customer: doc.customer,
	invoice_date: doc.date,
    line_product: line.product,
    line_item_count: line.item_count,
    line_item_amount: line.item_amount
  };
});
You can use Underscore.js functions (like _.each) in your custom JavaScript code.
Please contact eazyBI support if you need help writing custom JavaScript code for your specific needs.
Validate JavaScript code
We recommend testing the Rest API endpoint results with JavaScript code applied.
It is enough to test the code with one row, but we recommend returning at least two rows to validate the Javascript code.
Authorize access to REST API source
In case of OAuth authentication in the first time you will be redirected to source application authorization page where you will need to authorize eazyBI access to source application data:

After successful authorization, you will be redirected back to the eazyBI Source columns mapping page. If there are any authentication errors, then you will see corresponding error messages - please review your authentication settings and try again.
Source columns mapping
REST API source columns mapping is similar to Excel or CSV file columns mapping where you specify which source data fields should be imported as corresponding eazyBI dimensions or measures. Please review Excel and CSV file upload documentation page if you have not yet done so.
You can click Generate default names toolbar button to turn on automatic dimension and level and measure name generation from column names (which is turned on by default when doing file upload). And when you have mapped columns that you want to import in eazyBI then you can click Hide unmapped columns to hide columns that will not be imported into eazyBI.
See example of GitHub issues columns mapping:
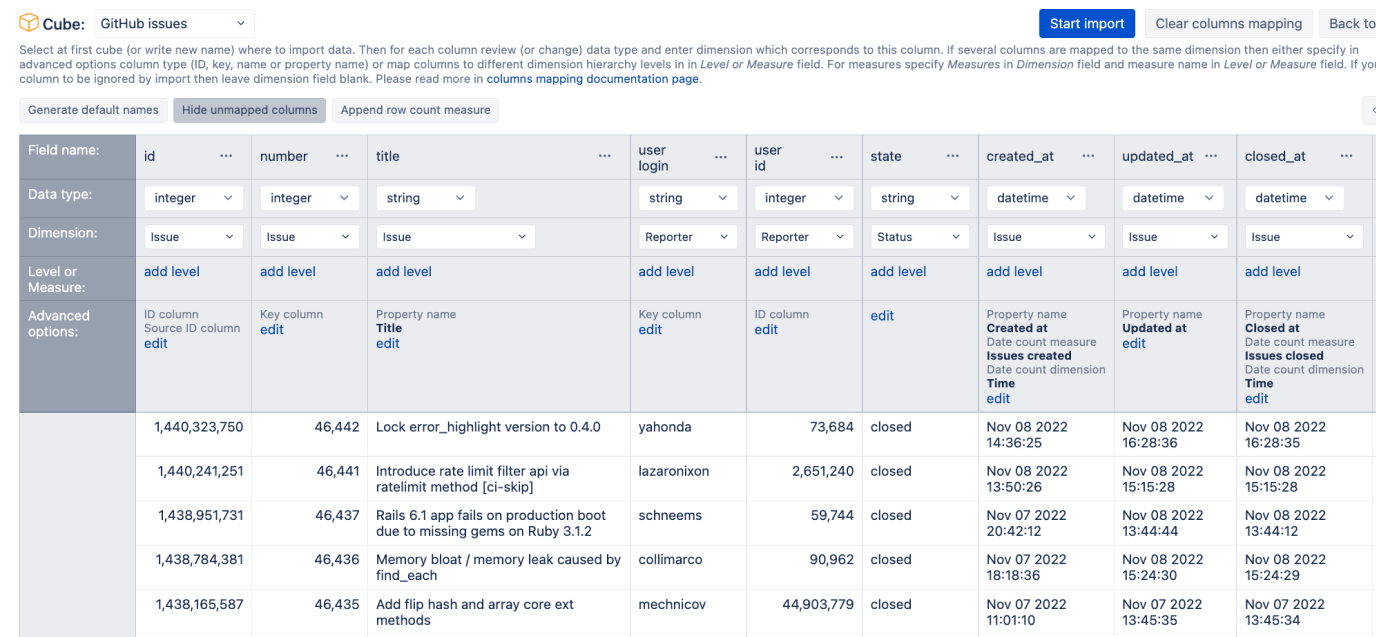
When you need to import several columns as the same dimension attributes, then click Show options and specify the following options:
- ID column – if attribute is a unique integer ID attribute of a dimension member (like issue
idattribute in this example). If ID column is not specified then dimension members will be identified by key column and IDs will be automatically generated for each new key column value. - Key column – if attribute is unique numeric or string key of dimension member (like issue
numberhere) - Name column – if attribute is longer name that should be displayed as dimension member name (if not specified then key column will be used as name column). But keep in mind that name column still needs to be unique within dimension (therefore in this case we will not use
titleas name as it might not be unique). - Ordinal column – if this attribute should be used to order dimension members.
- Source ID column – if incremental import is used then specify exactly one Source ID column that is a unique identifier of the source data row.
- Property name – specify if attribute should be imported as additional property for dimension member which is identified by ID or key column (like issue
titlein this example). - When importing date or datetime field as dimension property you can specify additional options:
- Date count measure - specify measure name that should store count of imported rows in this date (in this example
Issues createdmeasure will show the count of issues that were created increated_atdate orIssues closedwill show the count of issues that were closed inclosed_atdate). - Date count dimension - specify time dimension which should be used for this measure (by default
Timedimension name is suggested).
- Date count measure - specify measure name that should store count of imported rows in this date (in this example
After mapping all necessary columns, you can click Start import. If there are any mapping errors, then they will be shown, and columns with errors will be highlighted. If you need to save draft of mapping then click Back to edit and confirm that you want to save changes.
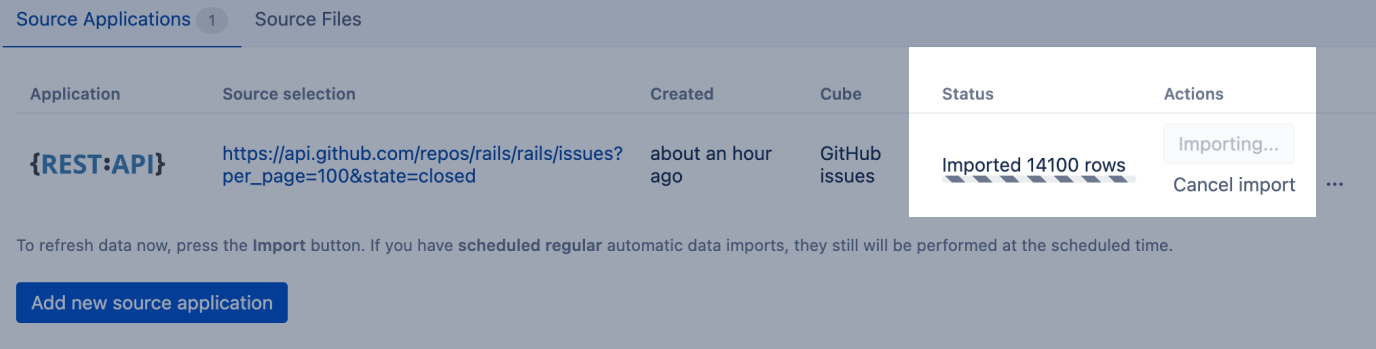
Importing of source data
If the source columns mapping was saved without any validation errors, then the REST API source application will be queued for background import. You will see the updated count of imported rows during the import:
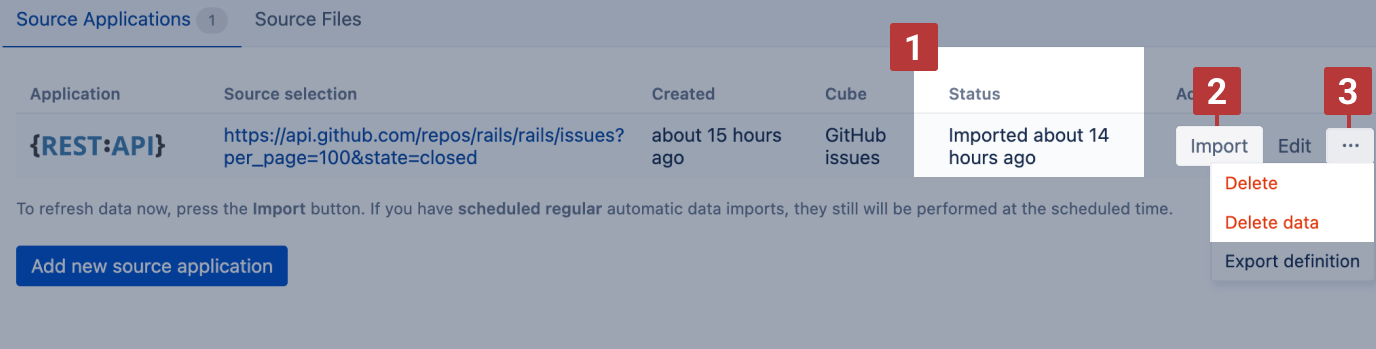
And after a successful import, it will automatically refresh the status of the source application [1].
You can later visit Source Data tab again and click Import button again [2] to import the latest data from REST API source. During each import it will at first delete all data that were imported previously from this source and then import new data.
If you want to change source data mapping, chose to Delete data to clear previously imrpoted data and mapping rules [2]. Or you can Delete the whole data source and its data if data source also requires changes.
If the scheduled data import fails with an error, eazyBI automatically tries to reimport data 10 minutes after the failed import and repeats these attempts 9 more times. Note that import itself might take some time until it fails and eazyBI starts reimporting data 10 minutes later. After the 10th unsuccessful import attempt, a notification email will be sent to owner of the eazyBI account.
Export definition
As it was mentioned in the beginning, you can export REST API source application definition:
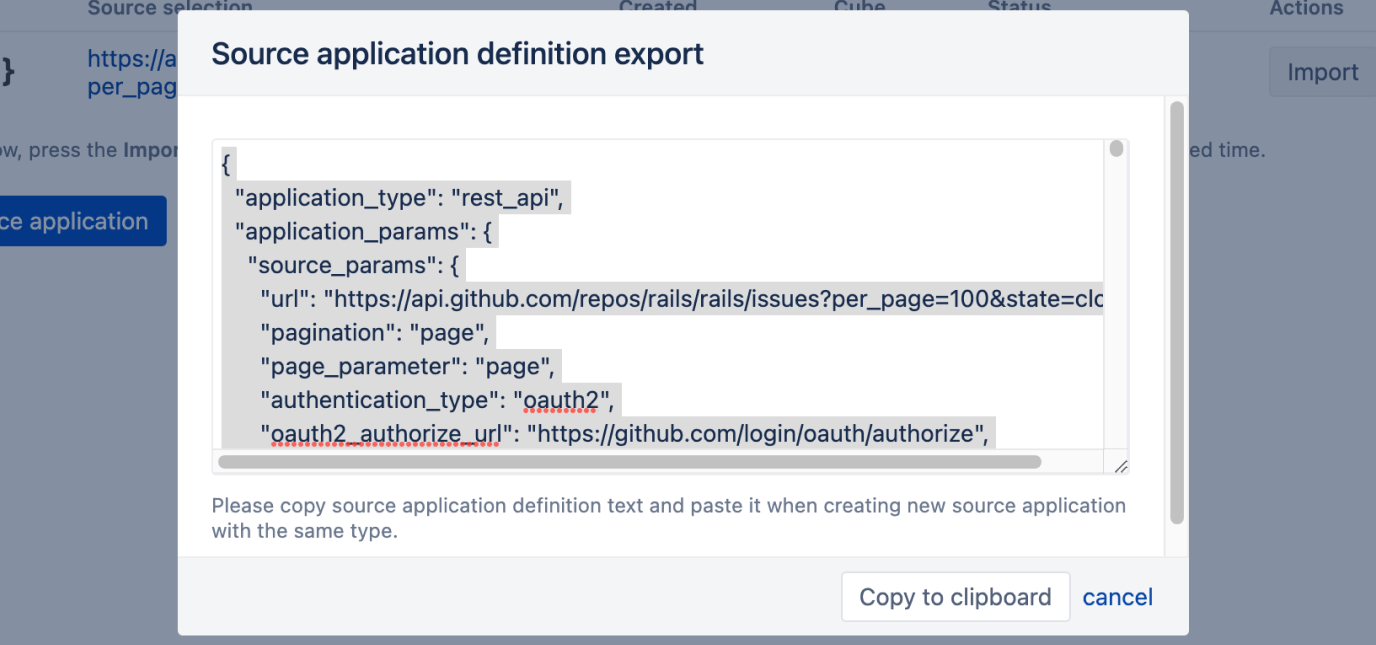
Copy this definition and paste it into the Import definition field when creating a different source application to create a new copy of this definition, which can be modified later.
GitHub issues source application definition example
If you would like to use this GitHub issues import example from this tutorial, then you can use the following source application definition:
You will need to register your own client application in GitHub account settings and get your Client ID and Client Secret.
If you need any help with REST API source data import then please contact eazyBI support.