Installation on Jira
eazyBI for Jira
On this page:
Checklist before installation
Supported versions
You can check supported Jira versions in Atlassian Marketplace. In addition, you will need MySQL 8.x, PostgreSQL 12 to 18, MS SQL Server 2017 or later, or Oracle 18c or later database. Linux, Windows, and macOS operating systems are supported.
Please contact eazyBI support if you have questions about supported versions or if you have any issues with your specific environment.
Java versions
Use the supported Java version for your Jira version:
- Jira 9.12 or 10.x — Java 11 or 17. Starting from Jira 10.6 — Java 21
- Jira 11.x — Java 21
Only Oracle or OpenJDK JVMs are supported.
Jira memory settings
Please review your current Jira memory settings before installing eazyBI. If your Jira server does not have enough available memory, then eazyBI might fail to start as well as overall Jira performance could be affected.
To ensure better eazyBI performance, it is recommended that you set Jira Java VM available memory to 2 GB or more. See Increasing Jira Memory for detailed instructions on how to do it in your Jira installation.
Specify JVM_MAXIMUM_MEMORY=2048m in your setenv.sh or setenv.bat file (if you run Jira as a Windows service, please follow Increasing Jira Memory / Windows service instructions instead). Later, while using eazyBI, check the Jira Administration / System / Troubleshooting & Support / System Info / Java VM Memory Statistics page to see how much available memory is used and if it is necessary to increase it more.
If eazyBI startup fails and you get SystemStackError: stack level too deep errors in localhost.*.log file (please see Troubleshooting for file location) then you have specified too low -Xss max stack size setting for Java VM. You can see if this -Xss option is used in Jira Administration / System / Troubleshooting & Support / System Info / JVM Input Arguments. Please either remove the -Xss option or increase it (the recommended setting is -Xss1024k) until eazyBI starts without the “stack level too deep” error.
It is possible to run eazyBI report queries in a separate JVM process. Please read more about the Child process option if you would like to enable it.
UTF-8 encoding
It is recommended to use UTF-8 encoding in the Jira configuration. Please add -Dfile.encoding=UTF-8 to JVM startup parameters if the default encoding is different than UTF-8.
You can check your current JVM default encoding in Jira Administration / System / Troubleshooting & Support / System Info / System Encoding.
NFS
If NFS is used for the Jira local or shared (in case of Data Center) home then it is recommended to use NFSv4 (instead of the old NFSv3).
eazyBI uses the "flock" command, which may freeze when accessing files on the old NFSv3 mount, and the locking is not properly configured. Please validate on all Jira Data Center nodes that "flock" is working correctly if using the old NFSv3 (update JIRA_SHARED_HOME with the corresponding path):
touch JIRA_SHARED_HOME/test_file
flock JIRA_SHARED_HOME/test_file -c 'sleep 1'
The "flock" should finish after a few seconds. If it hangs for more than 10 seconds, then it is not working properly. The most common cause is a firewall blocking ports used for file locking.
Installation
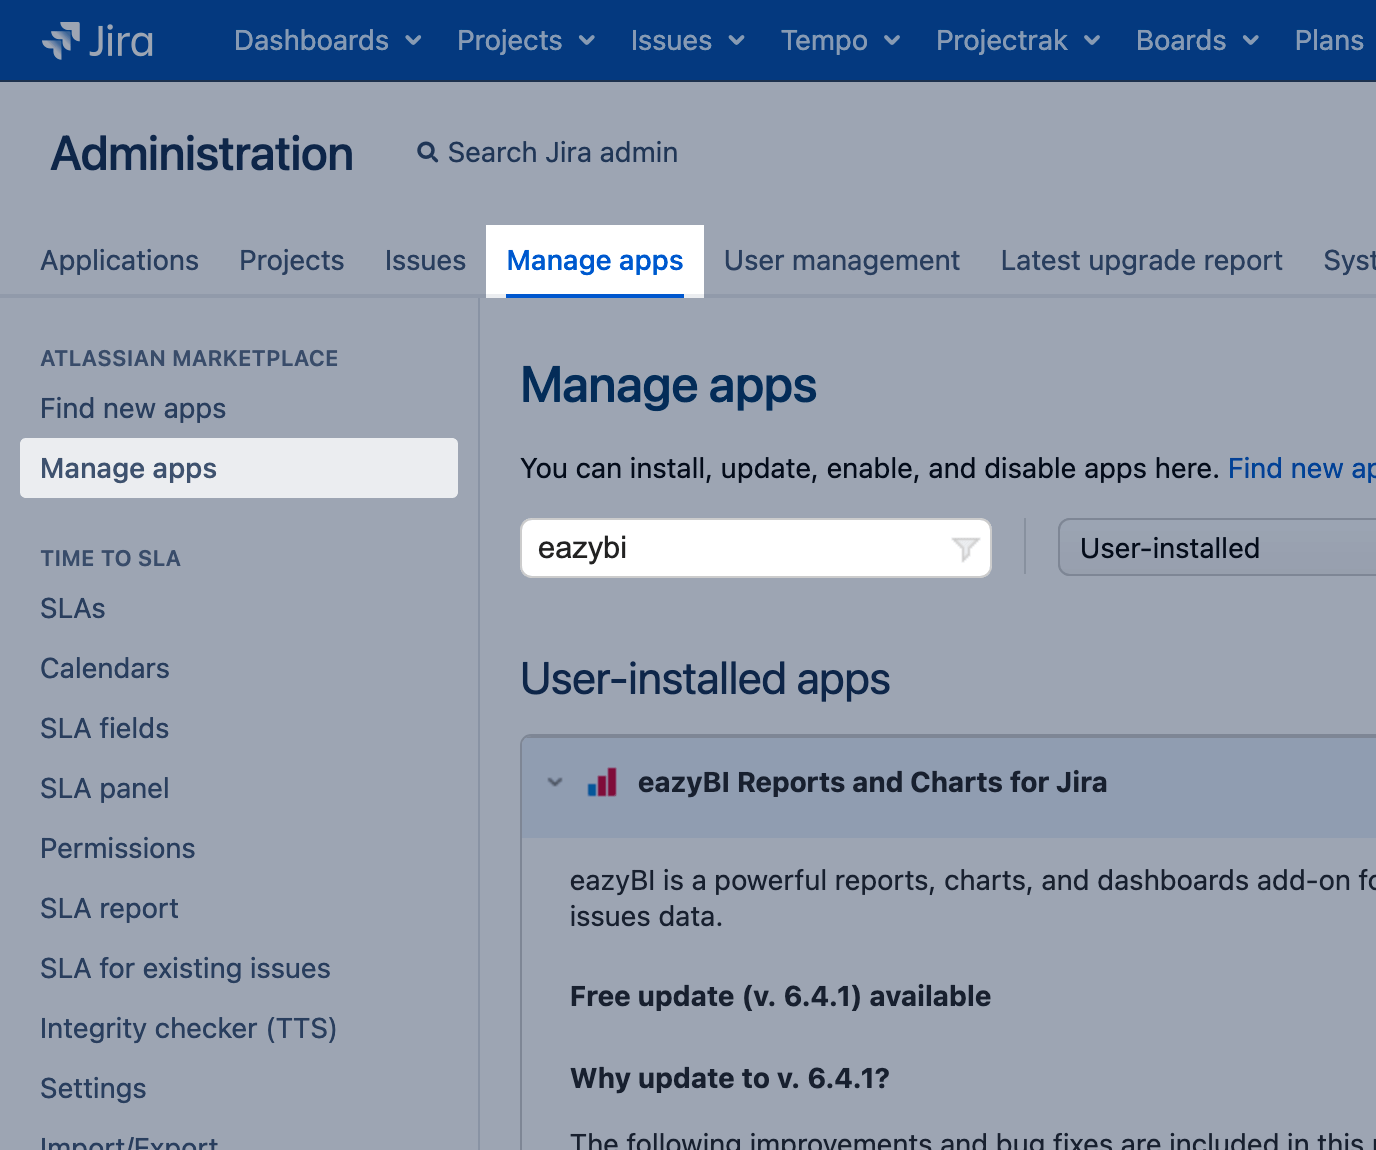
Download the eazyBI app from the Atlassian Marketplace page or install it using Jira Administration / Manage apps.
You should have Jira system administration rights to install apps. Go to the main Administration screen and then go to the Manage apps link. Then either find and install the eazyBI app from Atlassian Marketplace, or if you have downloaded the app, then go to the Manage Apps page and upload the downloaded eazyBI app file.
Initial setup
After eazyBI installation, click the Configure link to open the eazyBI settings page. Or if you click Exit Administration, then you should see the eazyBI link in the top navigation bar.
It might take about half a minute while eazyBI loads for the first time. If you selected the eazyBI link, you should see the eazyBI welcome page. To set up eazyBI, you should be logged in as a Jira user with system administration rights. Click Set up eazyBI to continue.
Database connection
eazyBI will store data in an additional MySQL, PostgreSQL, Microsoft SQL Server, or Oracle database. You can use the same database server that Jira uses, or you can also use a different database server. It is recommended that you create a separate database user for eazyBI needs (by default, with the name eazybi_jira), which will then create additional databases on a specified database server.
Please make regular backups of the additional eazyBI database in the production environment. eazyBI database contents will not be included in the standard Jira XML backup or in the Jira database schema backup.
You might get an error if you migrate the eazyBI database and change the database adapter. To solve this, please disable and re-enable the eazyBI app before continuing.
The following are database server-specific instructions for the eazyBI database setup.
MySQL
As a MySQL administrator, create a MySQL user eazybi_jira with access rights to all databases that start with eazybi_jira:
CREATE USER 'eazybi_jira'@'%' IDENTIFIED BY 'secret';
GRANT ALL PRIVILEGES ON `eazybi_jira%`.* TO 'eazybi_jira'@'%';
(Replace secret with a chosen password). When you save eazyBI settings, then a database connection will be established, and a database will be created. Later, when additional eazyBI accounts are created, then each account data will be stored in separate databases with names eazybi_jira_dwh_N where N is the account ID number.
You should add the MySQL JDBC driver to your application server. If you have already done this for the Jira main database, you don’t need to do anything else; eazyBI will use the same installed MySQL JDBC driver.
If you have a large number of Jira issues, then tuning MySQL memory settings is recommended for faster eazyBI Jira data import. The following my.cnf settings are recommended:
innodb_buffer_pool_size = 1024M
innodb_log_file_size = 256M
query_cache_size= 16M
query_cache_type = 1
max_connections = 200
innodb_buffer_pool_size will specify how much database data MySQL can store in memory – adjust it to your available server memory (the more data MySQL will store in memory, the less disk input/output operations will be performed). If you change innodb_log_file_size then you must delete existing MySQL log files before starting the MySQL server.
Please adjust max_connections as needed based on MySQL usage by all applications. eazyBI connection pool will use up to 50 database connections.
PostgreSQL
Create a PostgreSQL database user with
CREATE ROLE eazybi_jira PASSWORD 'secret' LOGIN CREATEDB;
This will also create a database, but if the database you want to use already exists, make sure this user is the OWNER of it, or you have granted all privileges to it.
After saving the eazyBI settings, a new eazybi_jira database will be created, and each new eazyBI account will store data in a new dwh_N schema (where N is the account ID number) in the same database.
If you have a large number of Jira issues, then for faster eazyBI Jira data import, it is recommended that you tune PostgreSQL memory settings. The following postgresql.conf settings are recommended:
shared_buffers = 512MB
wal_buffers = 16MB
max_connections = 200
shared_buffers will specify how much database data PostgreSQL can store in memory – adjust it to your available server memory (the more data PostgreSQL will store in memory, the less disk input/output operations will be performed). wal_buffers affects the performance of writing transaction logs to disk.
Please adjust max_connections as needed based on PostgreSQL usage by all applications. eazyBI connection pool will use up to 50 database connections.
If you are using the SSL mode to connect to PostgreSQL server, note that the default SSL mode in the driver of eazyBI is verify_full . It is possible to switch the SSL mode by using the Database advanced settings. The following settings switch the SSL to "require" mode:
[properties]
sslmode = "require"
Please check the PostgreSQL documentation for more details on the possible options of SSL mode options.
Microsoft SQL Server
Create an MS SQL Server user eazybi_jira – If you use SQL Server Management Studio, then select SQL Server authentication and uncheck Enforce a password policy. In addition, from Server Roles select dbcreator (to allow the creation of a new eazybi_jira database). If you do not want to grant the dbcreator role to this user, then create the eazybi_jira database manually and use the eazybi_jira user as the owner of this database. For more detailed information on how to set up the database, we recommend following the steps in the Atlassian documentation.
In database connection settings, provide the hostname, leave the port blank (if default 1433 is used), leave the instance blank (if the default should be used), and enter a database, username, and password. After saving the settings, a new database will be created (if not yet present), and each new eazyBI account will store data in a new dwh_N schema (where N is the account ID number) in the same database.
We recommend enabling the database option READ_COMMITTED_SNAPSHOT , as it helps to avoid deadlocks:
ALTER DATABASE EAZYBI_JIRA SET READ_COMMITTED_SNAPSHOT ON;
If deadlocks persist after enabling READ_COMMITTED_SNAPSHOT for a few days, increase the deadlock resolution time in eazyBI's database advanced settings. This setting extends the timeout to 60 seconds, giving more time to resolve deadlocks.
[properties]
lockTimeout = 60000
Oracle
Create an Oracle database user eazybi_jira. For example, create from sqlplus with the Oracle system user:
CREATE USER eazybi_jira IDENTIFIED BY secret DEFAULT TABLESPACE users;
GRANT CONNECT, RESOURCE TO eazybi_jira;
(Replace secret with the chosen password. Please make sure the eazybi_jira user has no TABLESPACE quota, or it is large enough. In the database connection settings, provide a hostname, database name (instance or SID), username, and password. You can use the same database instance that is used by Jira, all eazyBI data will be stored in a separate eazybi_jira user schema.
eazyBI will use the Oracle JDBC driver ojdbc*.jar from the Jira installation directory lib subdirectory. If you are using Oracle as a Jira database then this JDBC driver file should be present there. If you run Jira on a database other than Oracle and want to use the SQL database sources in eazyBI, you should add this file manually. In this case, a Jira restart might be needed for Jira to detect the new driver.
If you would like to specify in the database connection settings the Oracle service name instead of the SID name, then please prefix it with /. So in the Database field, use either SID_NAME or /SERVICE_NAME.
You can also specify the Oracle database connection's TNS alias (when using the tnsnames.ora file) or a full TNS connection string. In this case, do not specify a Hostname in the eazyBI database connection parameters. Just specify the TNS alias or a connection string in the Database name:
- When using a TNS alias, please ensure that
oracle.net.tns_adminJava property is set to the TNS admin directory. - When using a TNS full connection string, you do not need to set this Java property. You can enter in the Database name the full connection string, for example:
(DESCRIPTION=(ADDRESS_LIST=(ADDRESS=(PROTOCOL=tcp)(HOST=localhost)(PORT=1521)))(CONNECT_DATA=(SERVICE_NAME=ORCL)))
It is recommended to set the OPEN_CURSORS system parameter to 1000. eazyBI keeps open prepared statements for frequently used SELECT, INSERT, and UPDATE statements and calls them with different bind variable values.
If there are any issues with establishing the database connection or with the database creation, then you will see the corresponding error messages after clicking the Update button.
Database advanced settings
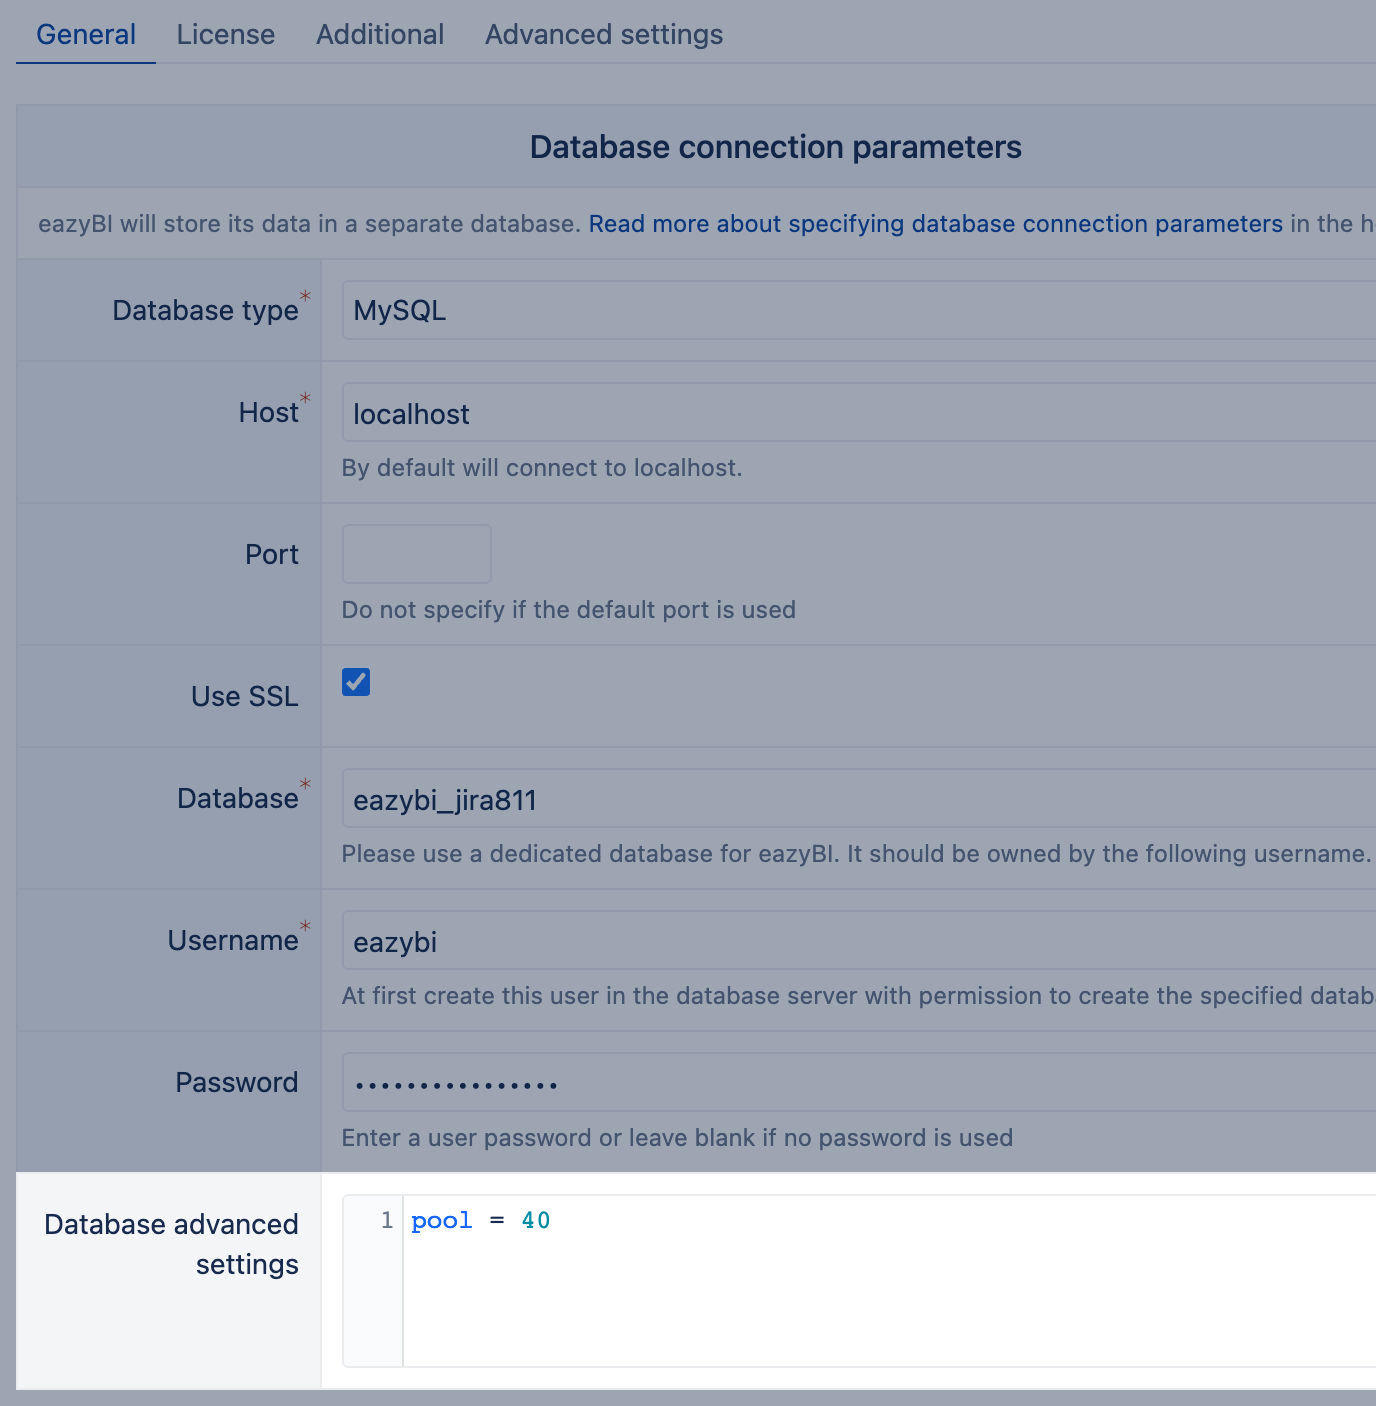
You can use the eazyBI Database advanced settings (eazyBI → System Administration → Settings → tab General) to change eazyBI database parameters. Changes are applied to eazyBI automatically; no eazyBI app restart is required.
It is recommended that you test them first in a test environment.
Increase database max pool size
Each eazyBI task, like displaying report results or performing the import, requires a connection to the database. By default, eazyBI is allowed to use 20 concurrent connections to the database. If you see errors in log files like
ActiveRecord::ConnectionTimeoutError (could not obtain a database connection. The max pool size is currently 20; consider increasing it.)
Increase the eazyBI connection pool size in the eazyBI general settings tab under the "Edit database advanced settings" link. For example, the following settings will increase the max pool size to 40
pool = 40
Before increasing this parameter, please check your database's maximum allowed connections. By default, eazyBI can use up to 50 connections, but increasing this parameter will lead to more connections being used.
You can calculate total max connections using the following formula:(pool size connections for main eazyBI process) + (pool size connections for eazyBI Child process, if it's enabled) + (maximum concurrent report queries, see Increase concurrent report queries)
For example, if you increase the database connection pool to 40 connections and use the eazyBI Child process, then eazyBI could use up to 40 + 40 + 10 = 90 connections.
JDBC connection URL properties
You can add any custom properties to the eazyBI JDBC connection.
For example, if you want to change the MS SQL domain authentication scheme to NTLM, use these settings:
[properties]
authenticationScheme="NTLM"
You can find the full list of properties for MSSQL here: https://learn.microsoft.com/en-us/sql/connect/jdbc/setting-the-connection-properties?view=sql-server-ver15.
Encrypt database password
The database password is stored in plain text format in the Jira server file system by default.
To enable the encryption of the password, establish the eazyBI connection to the eazyBI database. That will create the database connection configuration in the eazybi.toml file, with the password stored in plain text.
Next, create a new "secret" text file. The file should contain at least 32 characters. eazyBI will use the content of this file as the encryption key.
After that, specify the path to your "secret" file in the eazyBI database advanced settings:
encryption_secret_path = "<ENCRYPTION_SECRET>"
Once you save these preferences, eazyBI will automatically encrypt the password within the eazybi.toml file.
Child process
Please read more about the Child process option, which is recommended for larger Jira Data Center instances.
License key
Select the license type Atlassian Marketplace (if you created a trial license key there) or eazybi.com (if you have received a partner license key).
Enter the corresponding license key (and also the organization name in case of eazybi.com license type). If there are any issues with the entered license name or key, then you will see the corresponding error message.
If you are using the Atlassian Marketplace license and the latest versions of App Manager, then license information will be entered in App Manager, and on this screen, you will only see the current license information.
After you have entered the database connection and license information, click Update database and license settings to continue.
If you need to return back to the eazyBI Settings screen, then log in as a Jira user with system administration rights, and on any eazyBI page, click on the System Admin link in the top right corner and then select Settings.
Perform the first Jira data import
If the database connection and license information are correct, then the eazyBI database will be created, as well as the first eazyBI account (with the default name “Jira reports”). In one eazyBI account, you can import one or several Jira projects, create reports, charts, and dashboards, and give access to selected Jira users and groups. If, in your Jira server, you have many different projects that are used by different user groups, then most probably you will need to create several eazyBI accounts and, in each account, import a related subset of Jira projects.
After clicking Create, a new Jira source application will be created, and you can
- Select which Jira projects you would like to import into the first eazyBI account.
- Select if you would like to import the status transitions history.
- how frequently a regular issue import should be scheduled (by default, once per day);
- Select custom fields to import (read more about supported custom field types).
Click Import to start importing data for issues from selected projects.
Check import results
After the import is completed, go to the Analyze tab and try to open sample reports.
Export to PDF
If you want to export dashboard pages to PDF or send regular emails with eazyBI dashboards as PDF attachments, please install the headless Google Chrome browser and Microsoft's Core Fonts on your Jira server.
REST API request error
eazyBI Jira import will perform REST API requests from the Jira server to itself (which is necessary for Jira Agile and Tempo Timesheets data import). If you see an error
Failed to make a REST API request to the Jira Base URL ...
in the settings page, then it means that there are Jira server setup problems that do not allow to make such REST API requests. Potential causes for these problems are the following:
The Jira server name (from the Jira Base URL) is not resolved to the correct IP address on the Jira server. If you are using a Linux server, then try to test it with the following command from the Jira server:
wget -d -O - JIRA_BASE_URL/rest/api/latest/serverInfo
where JIRA_BASE_URL is the Base URL in Jira Administration / System / System Info. Please send the output of this command to eazyBI support if you need help to resolve this issue.
Another potential cause can be port mapping using
iptableswhich probably maps ports just for incoming connections and not for local connections.
Please see the Local REST API requests section in the advanced settings documentation to learn more about how to disable local REST API requests or to specify a different Jira base URL for local REST API requests.
Microsoft's IIS data import error
If you are using the Microsoft IIS web server, which proxies the incoming requests to Jira, then you might get an error message when clicking the Import button in the Source Data tab. The potential cause for this error is that IIS can be configured to return custom error messages, and IIS is discarding the body of HTTP requests with the HTTP status code 422. To ensure that the HTTP body is returned for these error messages, you need to set the <httpErrors> element attribute existingResponse value to PassThrough.
Please read more about the IIS error page configuration.
Version upgrade
We highly recommend upgrading the eazyBI version during less busy office hours. During the upgrade, eazyBI reports will not load.
Recommended steps to upgrade the eazyBI app for Jira Data Center.
- Navigate to the Jira system administration page > Manage apps
- Find and expand the eazyBI app.
- Click "Update" to upgrade eazyBI to the latest version available on Atlassian Marketplace
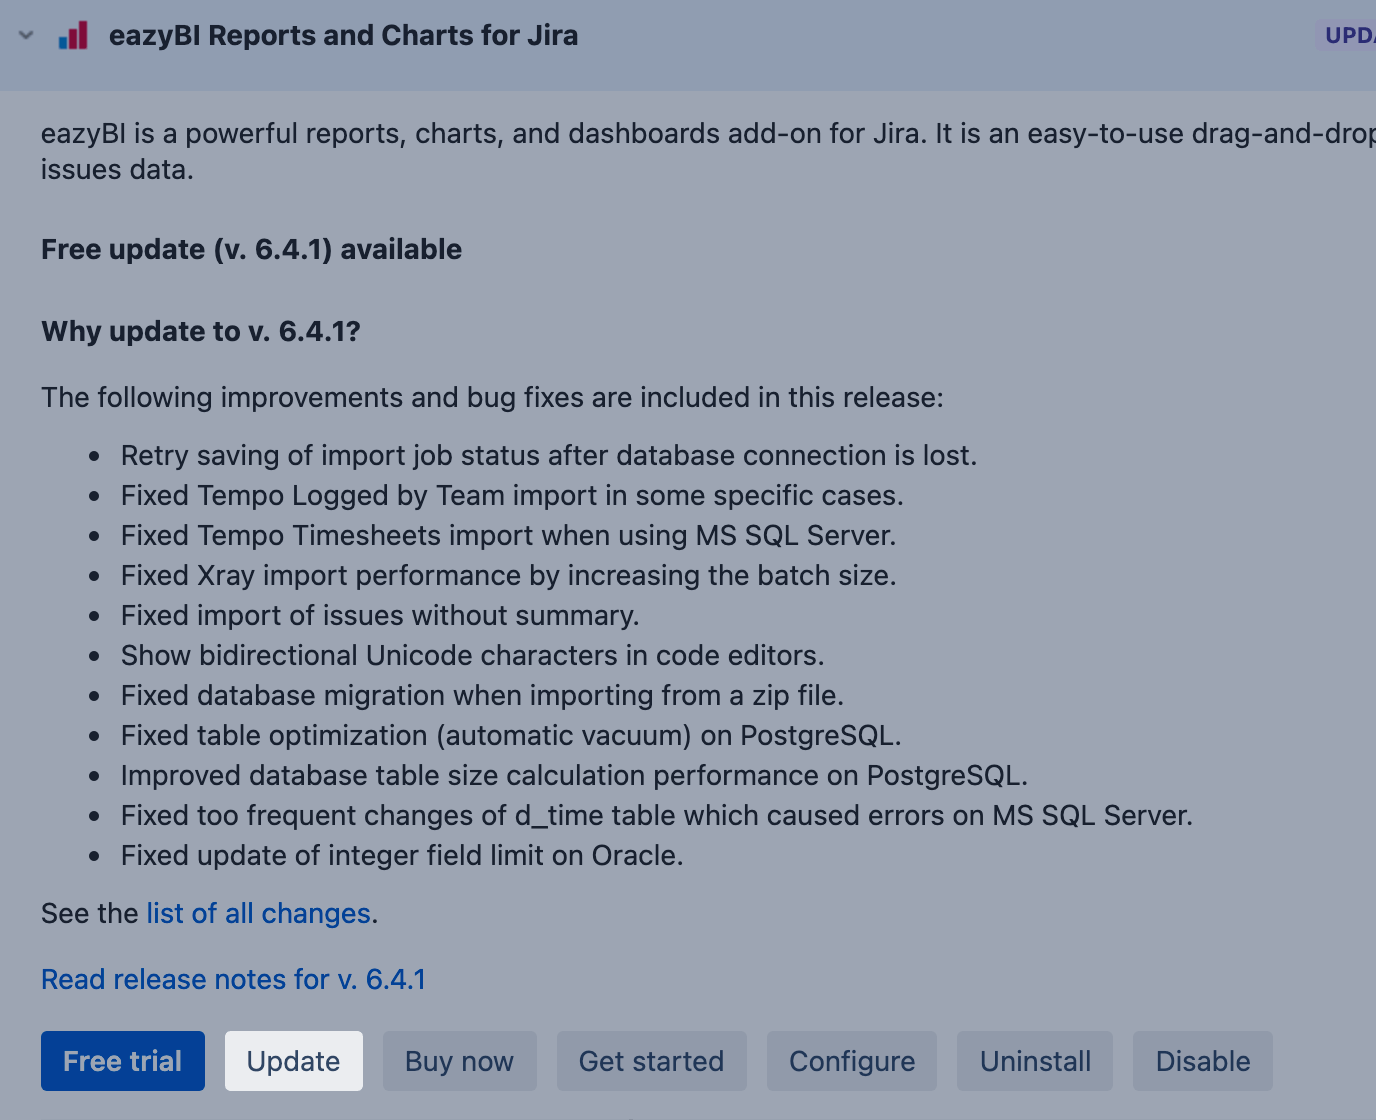
It will require Jira system administrator user rights to upgrade the eazyBI app version on Jira.