JavaScript calculated custom fields
This page describes advanced Jira and eazyBI integration. If you need help with this please contact eazyBI support.
If you would like to pre-calculate and import in eazyBI additional calculated custom fields then
- you can either use some add-on in Jira to create some Jira calculated and scripted custom fields,
- or you can define calculated custom fields using JavaScript in eazyBI advanced settings as described further (and then they will be available just in eazyBI and not in Jira).
If you have larger number of Jira issues then it is better to import calculated custom fields and not to create calculated members with complex MDX formulas. Calculated custom fields are pre-calculated just once during Jira import and then saved in the eazyBI database and then eazyBI queries will perform much faster using pre-calculated data.
On this page:
Define calculated custom field in eazyBI advanced settings
You should define an additional custom field in the advanced settings with the following additional settings:
- Use your own
customfield_NAME
custom field name whereNAME
is some unique descriptive name of your additional calculated custom field. - Add a
name
setting and specify a display name for this calculated custom field that will be visible in Jira import custom fields selection (these calculated custom fields will be always visible for any Jira project selection). - Add
javascript_code
which will calculate and store inissue.fields.customfield_NAME
result of the calculation. This JavaScript code can use theissue
object in the same way as in the custom JavaScript code in Jira import options.
The order of the execution of JavaScripts for custom field calculations is not defined. We recommend avoiding reference from one JavaScript calculated custom field to another as it can give an unpredictable result.
Here is an example of a calculated custom field "Issues overdue" which will return 1 if issue has a due date and either resolution date is after a due date (for resolved issues) or a due date is in the past (for unresolved issues). Add to the advanced settings:
[jira.customfield_overdue] name = "Issues overdue" data_type = "integer" measure = true javascript_code = ''' if (issue.fields.duedate) { var resolutionOrCurrentTimestamp = issue.fields.resolutiondate ? Date.parse(issue.fields.resolutiondate) : (new Date).getTime(); if (Date.parse(issue.fields.duedate) < resolutionOrCurrentTimestamp) { issue.fields.customfield_overdue = 1; } } '''
Then import "Issues overdue" custom field as a measure and eazyBI will create measures "Issues overdue created", "Issues overdue due" (total of unresolved issues that are past their due date), "Issues overdue resolved" (total of resolved issues that were late).
How to make changes in advanced settings
There might be a situation when you want to adjust or change the JavaScript calculated custom field in advanced settings but changes are not working as expected. Whenever changing advanced settings for custom fields, you might want to perform double data import to ensure the correct outcome of changes.
- In the import option, deselect the custom field from data import and import data. This action will clear the previous data and data structures (even you see them as empty).
- Wait for data import to complete.
- In the import option, select the custom field for data import and import data for the second time.
Validate the Javascript code before using it in the custom field definition
If you would like to test and debug your JavaScript code then open Jira import options page and paste your code in Custom JavaScript code and specify an issue key on which you would like to test your JavaScript code. Please note, that in the field Custom javaScript code yuo should paste only the javascript_code part (code between opening and closing qutation marks '''
) without other parameters for advanced settings.
It might be difficult to find your custom field value in issue.fields
then during validation it is easier to assign the result to top-level issue
property as then you will not need to expand issue.fields
. (In this example during testing assign the result to issue.customfield_overdue
and when you see that it is working as expected then change it to issue.fields.customfield_overdue
)
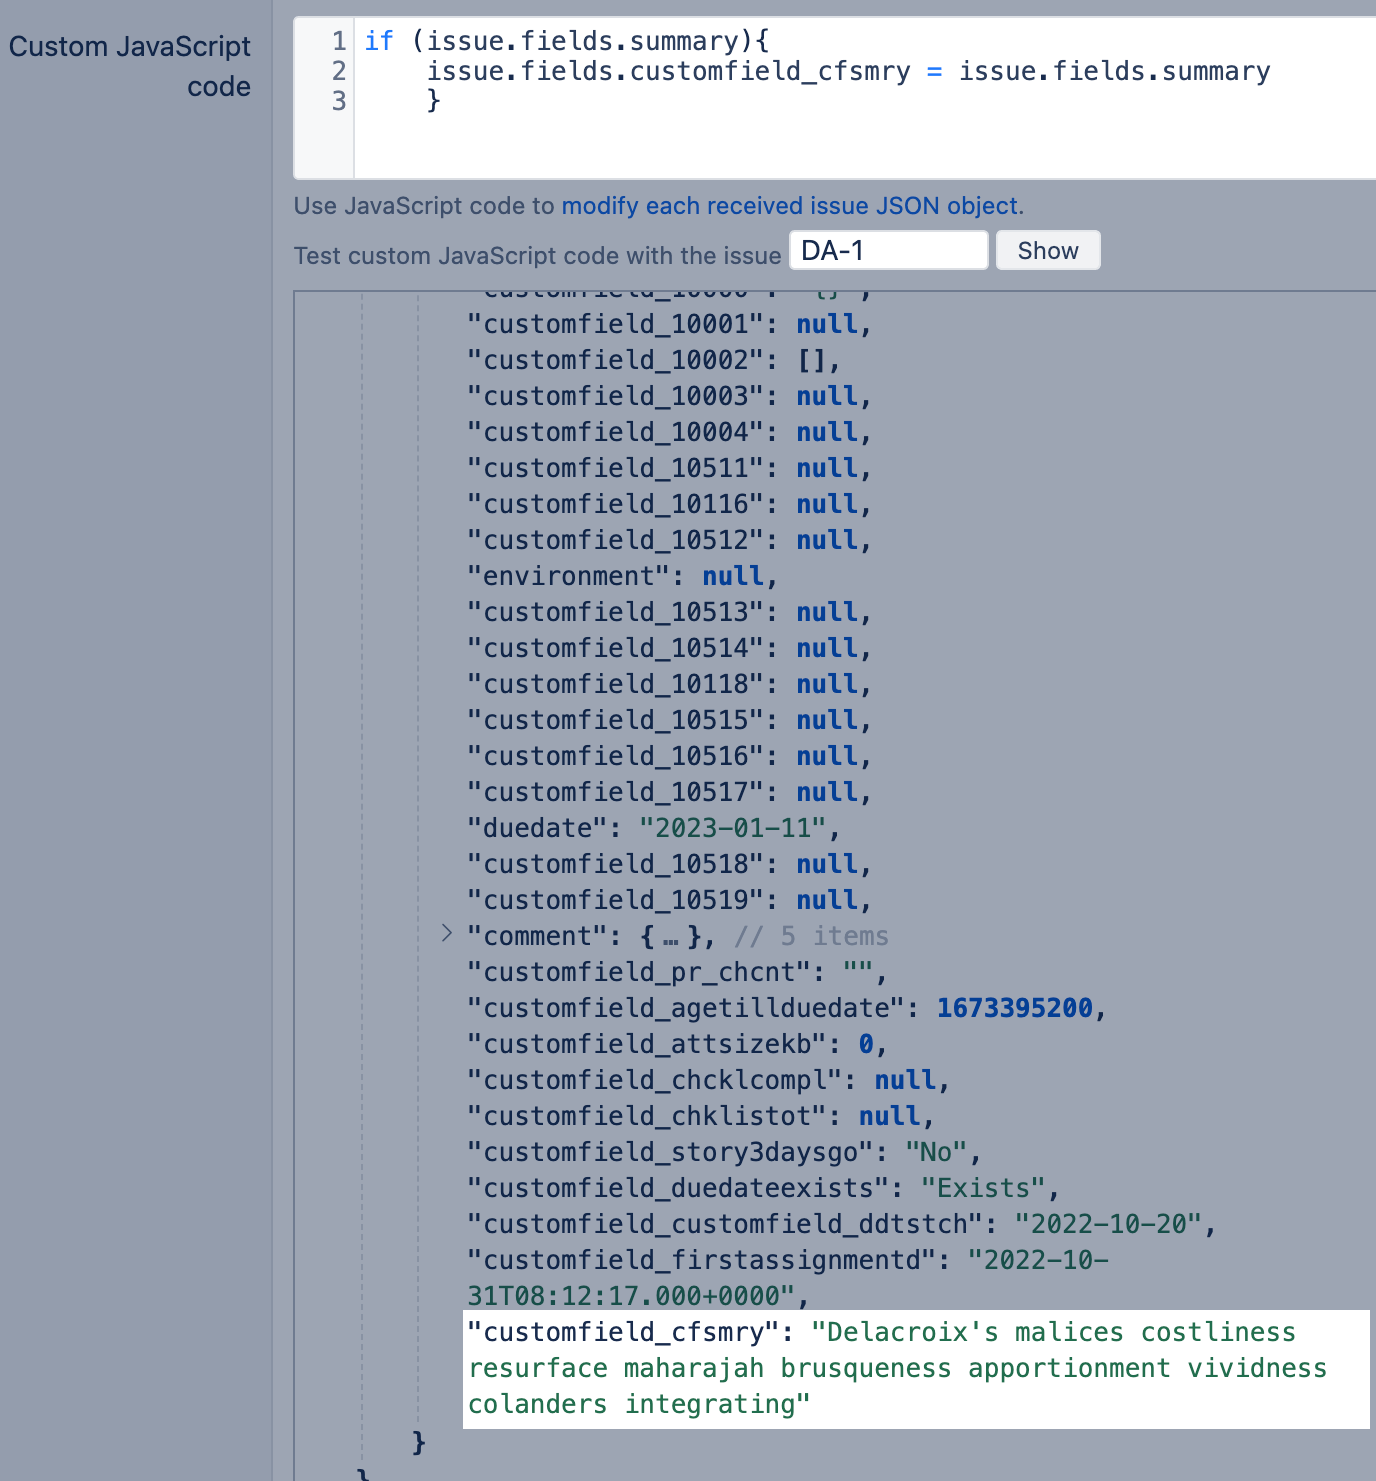
By default, you can see only standard-issue fields as well as selected custom fields in the issue JSON object. Additional issue fields comment
and issuelinks
will be returned only if issue.fields.comment
and issue.fields.issuelinks
are used in the JavaScript code to access these fields.
See a short video on validation here:
Custom calculated field as an interval dimension
You can define calculated custom fields also for import as an interval dimension. In this case, specify the following additional settings:
dimension
set totrue
- In
javascript_code
set the value of the custom field as a number of seconds, minutes, hours or days. If the interval dimension is for a duration then this should be the number of time units between two dates. If the interval dimension is for an age then the number should be a Unix timestamp (number of seconds since January 1, 1970). - In
time_unit
specify the corresponding time unit. - In
time_inverval
specify eitherage
orduration
. - In
intervals
andinterval_unit
specify the default interval ranges that should be used (which can be later changed in the Analyze tab).
The first is an example of "Age since updated interval" dimension which will show the age intervals (from the last update date until now) for unresolved issues:
[jira.customfield_updated_age_ts] name = "Age since updated interval" data_type = "integer" dimension = true javascript_code = ''' if (!issue.fields.resolutiondate) { issue.fields.customfield_updated_age_ts = Math.floor(Date.parse(issue.fields.updated) / 1000); } ''' time_unit = "seconds" time_interval = "age" intervals = "/10" interval_unit = "days"
The following is an example of "Custom resolution interval" dimension which will show the duration intervals from the issue created date until the custom resolution date (instead of the standard Resolved date) for all issues having this custom resolution date. You may use any two dates instead of issue creation date and the custom resolution date.
[jira.customfield_custom_resolution_interval] name = "Custom resolution interval" data_type = "integer" dimension = true javascript_code = ''' if(issue.fields.customfield_NNNNN) { issue.fields.customfield_custom_resolution_interval = (Date.parse(issue.fields.customfield_NNNNN) - Date.parse(issue.fields.created)) / 1000 / 60 / 60 / 24; } ''' time_unit = "days" time_interval = "duration" intervals = "8,15,31" interval_unit = "days"
Calculated worklog custom field
Available from eazyBI version 4.1.
Worklog description/comments can not be imported from Tempo Timesheets when eazyBI is used for Jira Cloud.
If you store some structured information in worklog comments also known as worklog description (for example if the work is billable or non-billable, or if it is overtime) then you can use calculated worklog custom fields to extract this structured information as a separate dimension.
You define a calculated worklog field as a JavaScript calculated field and in addition:
- Specify
worklog = true
which will indicate that it is a worklog custom field. - In
javascript_code
use theworklog
object (which contains JSON representation of one worklog entry as in issue JSON representation). Worklog comment can be accessed asworklog.comment
.
The custom field value should be assigned toworklog.customfield_NAME
.
Here is an example of a Worklog Comment dimension which will import the worklog comments/description + its id
[jira.customfield_wlcomment] name = "Worklog Comment" data_type = "string" dimension = true worklog = true javascript_code = ''' if (worklog.comment) { worklog.customfield_wlcomment = worklog.comment+" ("+worklog.id+")"; } else { worklog.customfield_wlcomment = "(no comment)" } '''
Import Worklog Comment as a dimension and then use it to analyze Hours spent measure.
Component
To import a component into a separate dimension you can use this calculated custom field definition in your eazyBI advanced settings
[jira.customfield_eazybicomponent] name = "Component" data_type = "string" multiple_values = true split_by = "," dimension = true javascript_code = ''' issue.fields.customfield_eazybicomponent = issue.fields.components; '''
After defining it, you should be able to import a new custom field via import options as dimension and property
Summary for Issues
To import a summary for Issue you can use this calculated custom field definition in your eazyBI advanced settings
[jira.customfield_sumry] name = "Summary" data_type = "text" javascript_code = ''' if (issue.fields.summary) { issue.fields.customfield_sumry = issue.fields.summary; } '''
After defining it, you should be able to import a new custom field via import options as property for each issue. Then you can display this property for "Issue" dimension issue-level members.
Description for Issues
To import a description for Issue you can use this calculated custom field definition in your eazyBI advanced settings
[jira.customfield_descr] name = "Description" data_type = "text" json_fields = ['description'] javascript_code = ''' if (issue.fields.description) { issue.fields.customfield_descr = issue.fields.description; } '''
After defining it, you should be able to import new custom field via import options as property for each issue. Then you can display this property for "Issue" dimension issue-level members.
This approach would work only when eazyBI for Jira Cloud is used. For Server and Datacenter plugin versions read here:https://docs.eazybi.com/eazybijira/data-import/data-from-jira-and-apps/jira-misc-custom-fields#JiraMiscCustomFields-Description
Last date when custom field changed
In eazyBI, it is possible to import single-value select custom field in a separate table with value changes by adding these advanced settings to your custom field (where you place your actual custom field ID instead of NNNNN)
[jira.customfield_NNNNN] data_type = "string" dimension = true separate_table = true changes = true
Then you could import this custom field as a dimension and import also value changes in eazyBI.
After that, you could update your eazyBI advanced settings with following Javascript code that should return the last date when custom field (use your actual field name in the code instead of <Customfield name> on Line15) was changed to defined value (use your actual value in the code instead of <Value> on Line15).
Here is an example of a Jira single-value select custom field which will return the last date when a pre-defined custom field was set to the pre-defined value:
[jira.customfield_valuechange] name = "Value change date" data_type = "date" measure = true javascript_code = ''' var customfieldChangeDate; if (issue.changelog && issue.changelog.histories && issue.changelog.histories.length > 0) { var histories = issue.changelog.histories; for (var i = 0; i < histories.length; i++) { var history = histories[i]; if (history.items && history.items.length > 0) { for (var n = 0; n < history.items.length; n++) { var item = history.items[n]; if (item.field == '<Customfield name>' && item.toString == '<Value>') { customfieldChangeDate = history.created; } } } } } issue.fields.customfield_valuechange = customfieldChangeDate; '''
Import Value change date as a measure and as a property.
Days for Assignee
To analyze how many days issue was assigned for each assignee until the issue resolution date, you can precalculate the time between assignee transitions based on issue change history for each issue and then import this information as a measure Days for assignee. The measure is also associated with Time dimension (by transition from assignee date)
[jira.customfield_days_for_assignee] name = "Days for assignee" data_type = "decimal" measure = true multiple_dimensions = ["Time","Assignee"] javascript_code = ''' var assigneehistory = new Array(); var datefrom = issue.fields.created; var assignee = null; resolution = false; issue.changelog.histories.forEach(function(history){ history.items.forEach(function(historyItem){ if (historyItem.field == "assignee") { assignee = historyItem.from; if (! resolution) { dateto = history.created; if(assignee){ duration = (Date.parse(dateto) - Date.parse(datefrom)) / 1000 / 60 / 60 / 24; assigneehistory.push(dateto.toString().substr(0,10) + "," + assignee + "," + duration); } datefrom = dateto; assignee = historyItem.to; } } if (historyItem.field == "resolution") { if (historyItem.to) resolution = true; else resolution = false; } }); }); if (issue.fields.resolutiondate && (issue.fields.assignee || assignee)) { if (!assignee) assignee = issue.fields.assignee.name; duration = (Date.parse(issue.fields.resolutiondate) - Date.parse(datefrom)) / 1000 / 60 / 60 / 24; assigneehistory.push(issue.fields.resolutiondate.toString().substr(0,10) + "," + assignee + "," + duration); } issue.fields.customfield_days_for_assignee = assigneehistory.join("\n"); '''
Use this measure in reports together with Assignee and/or Time dimension.
Comment when issue flagged
To import a comment when issue was flagged you can use this calculated custom field definition in your eazyBI advanced settings
#Last comement added with Flag [jira.customfield_flcomment] name = "Comment when flagged" data_type = "string" json_fields = ["comment"] javascript_code = ''' if (issue.fields.customfield_NNNNN && issue.fields.comment && issue.fields.comment.comments && issue.fields.comment.comments.length > 0) { var commentsarray = issue.fields.comment.comments; for (var i = 0; i < commentsarray.length; i++) { var commenthist = commentsarray[i]; if (commenthist.body && commenthist.body.indexOf("(flag) Flag added")>=0 ) { var flcomment = commenthist.body.split('Flag added\n\n')[1]; break; } } if(issue.fields.customfield_NNNNN){ issue.fields.customfield_flcomment = flcomment;} } '''
After defining it, you should be able to import new custom field via import options as property for each issue. Then you can display this property for "Issue" dimension issue-level members.
Last comment for issue
To import (as property) a body of the last comment added on the issue, you can use this calculated custom field definition in your eazyBI advanced settings
[jira.customfield_lastcommentt] name = "Last comment text" data_type = "text" javascript_code = ''' if (issue.fields.comment && issue.fields.comment.comments && issue.fields.comment.comments.length > 0) { var lastcomment = issue.fields.comment.comments[issue.fields.comment.comments.length-1]; issue.fields.customfield_lastcommentt = lastcomment.body; } '''
After defining it, you should be able to import new custom field via import options as property for each issue. Then you can display this property for "Issue" dimension issue-level members.
Date for the last comment
To import a date when the last comment was added on issue you can use this calculated custom field definition in your eazyBI advanced settings
[jira.customfield_lastcommentdate] name = "Latest comment date" data_type = "datetime" json_fields = ["comment"] javascript_code = ''' var comments = issue.fields.comment.comments; if (comments.length > 0) { var comment = comments[comments.length - 1]; issue.fields.customfield_lastcommentdate = comment.created; } '''
After defining it, you should be able to import new custom field via import options as property for each issue. Then you can display this property for "Issue" dimension issue-level members.
A similar approach can be used to import the date when the first comment was added.
Multi-level cascading field
To import a multi-level cascading field from (Jira app provided by Sourcesense) you can try using this Javascript code (where you must use your multi-level custom field ID instead of NNNNN)
Code my vary depending on how many levels should be defined.
[jira.customfield_NNNNN] data_type = "string" dimension = true levels = ["Level 1","Level 2","Level 3"] split_by = "," javascript_code = ''' var cfList = []; if (issue.fields.customfield_NNNNN) { for (var i=0; i < issue.fields.customfield_NNNNN.length; i++) { var cfVal= issue.fields.customfield_NNNN[i].value; cfList.push(cfVal) } } if(cfList){ issue.fields.customfield_NNNNN = _.uniq(cfList).join(","); } '''
After defining it in advanced settings, you can import new custom field via import options as dimension and property.
Status category change date for a new calculated field
The next approach would work only for Jira Cloud app!
There are some default Jira fields which are being returned in JSON view (via import options > additional options) but which can't be used by default when calculating other calculated fields using Javascript.
In such cases, the additional line Json_fields = ["Jira Field name"] should be used in advanced settings to access the field during data import.
[jira.customfield_newfieldID] name = "Status Category Change week" data_type = "string" dimension = true json_fields = ["statuscategorychangedate"] #this line is mandatory javascript_code = ''' if (issue.fields.hasOwnProperty("statuscategorychangedate")) { var sccd = new Date(Date.parse(issue.fields.statuscategorychangedate)); sccd.setDate(sccd.getDate() - ((sccd.getDay() - 5 + 7) % 7)); issue.fields.customfield_newfieldID = sccd.toISOString().substr(0, 10); } '''
The Javascript code returns a week start date. The 5 is the key: that is the day number for the starting day of the week. In this case, it is Friday (5). If you wanted your week to begin on Tuesday, use a 2.
After defining it in advanced settings, you can import new custom field via import options as dimension and property.
List of fix versions for issues
There are some cases when you would need to display all fix Versions for an issue in a separate column.
[jira.customfield_fversion] name = 'FixVersions' data_type = 'string' javascript_code = ''' var versionList = []; if (issue.fields.fixVersions ) { for (var i=0; i < issue.fields.fixVersions.length; i++) { var versionName = issue.fields.fixVersions[i].name; versionList.push(versionName); } } if (versionList){ issue.fields.customfield_fversion = _.uniq(versionList).join(","); } '''
The Javascript code returns a comma-separated list of fix versions, which you could import for issues as the property and use as a measure in the report when it has "Issue" dimension members at issue-level in rows