Advanced settings for custom fields
eazyBI for Jira
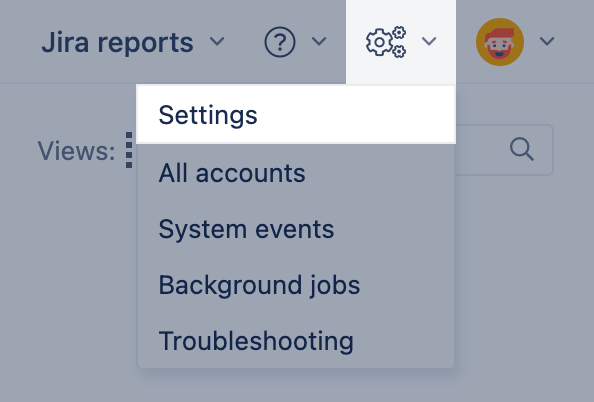
You can use eazyBI advanced settings (available only to Jira system administrators, Jira trusted users, and eazyBI admins) to add support for additional Jira custom fields as well as modify import options for standard custom fields.
eazyBI advanced settings are defined using the TOML format.
On this page:
Additional custom fields
If you would like to import in eazyBI an additional Jira custom field with a custom field type that is not supported by default, then you can add a definition of how this custom field should be imported. Also, if some default custom field settings should be changed, then it can be done by adding the necessary custom field configuration parameters.
If you need to change a default custom field settings in a single eazyBI account, you can edit the custom field import options in the specific account.
At first, you need to find out Jira custom field ID. You can see the custom field ID when you hover over the custom field name in the eazyBI import settings. Also, in Jira Data Center you can see a custom field ID in the URL when entering the Configuration screen of this field. For example, if the end of the URL is ...admin/ConfigureCustomField!default.jspa?customFieldId=10100, the field ID is 10100.
Then add the following line to advanced settings:
[jira.customfield_NNNNN]
where NNNNN is the custom field ID. This will start the block of configuration parameters for the NNNNN custom field. After that line, specify the data type of this field:
data_type = "string"
By default, the string maximum length is 255 characters. If there is a need to import longer string values, then use an additional setting limit and specify the maximum length.
Other available types are text, integer, decimal, date, datetime.
If you use the decimal data type, then by default the precision (maximum number of digits) is 15 and the scale (digits after the decimal point) is 2. You can change these defaults with additional precision and scale settings.
If you would like to import a custom field as an additional dimension add the setting dimension. Note you can import only string, integer, and decimal data types as dimensions.
dimension = true
If the custom field can contain multiple values for a single issue, then add
multiple_values = true
If the custom field returns a string with comma-separated values (see example definition of calculated text field) which should be imported as multiple values then add also (note that multiple values can be provided with another delimiter, please, use the appropriate character in this setting):
split_by = ","
If you would like to import a numeric custom field as a measure add the setting measure. Note you can import only integer, decimal, date, and date-time data types as measures.
measure = true
Here is an example of a custom string type dimension definition:
[jira.customfield_10100]
data_type = "string"
dimension = true
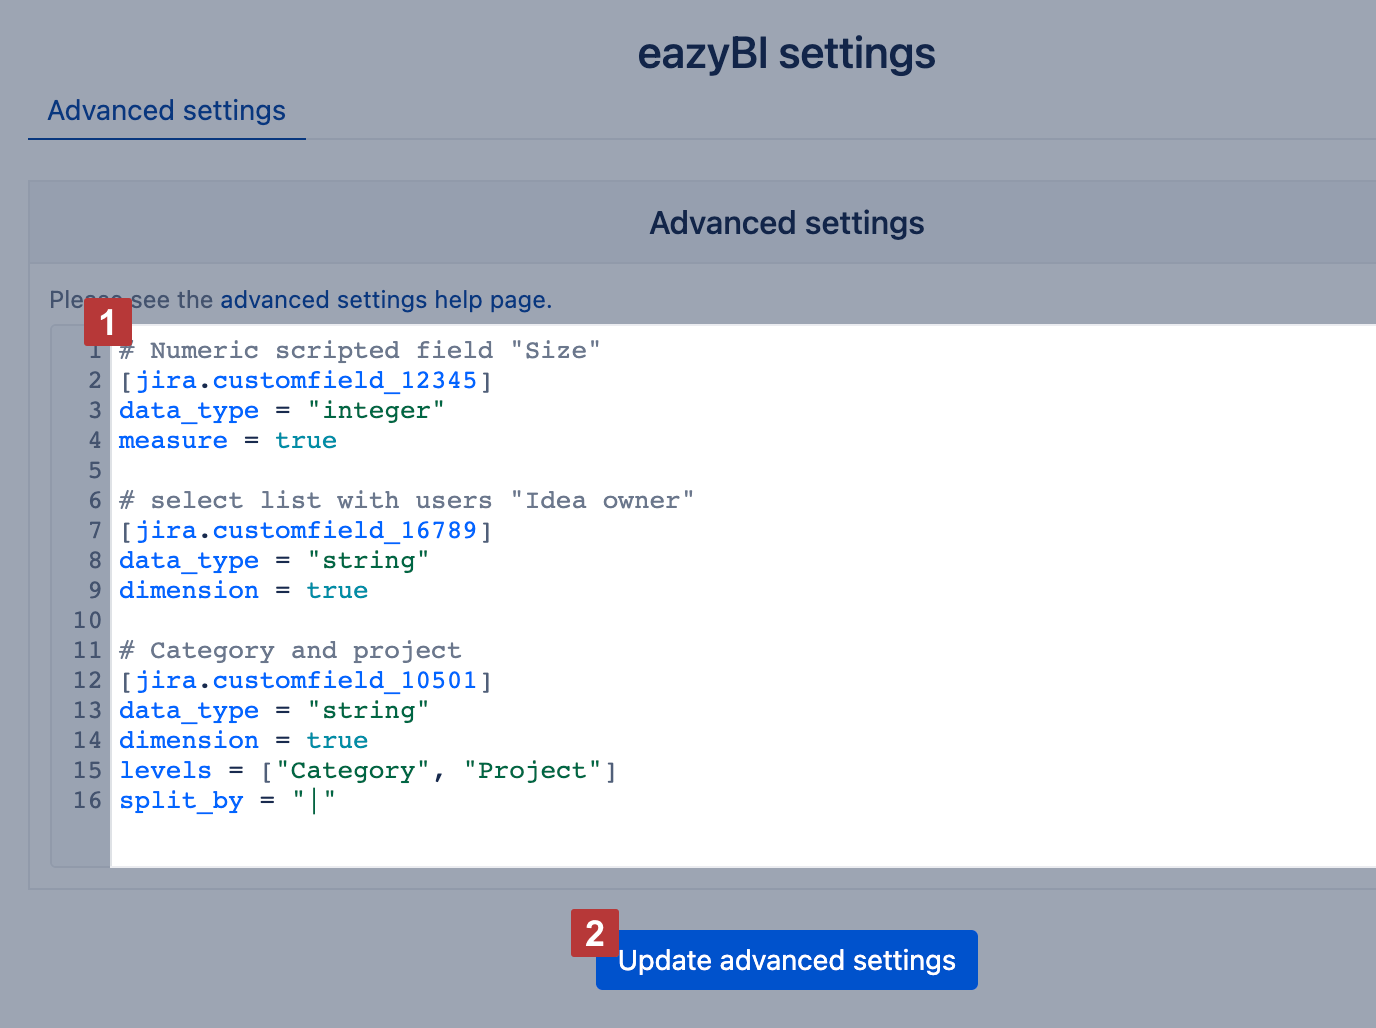
Add additional custom field definitions as needed [1] in the advanced settings text area field and then click Update advanced settings [2].
Finally, go to eazyBI import options, tab Custom fields, and select your newly defined custom field for import.
Multi-Level custom field import
For the custom field that is created using the Multi-Level Cascading Select plugin, please add the following advanced options
[jira.customfield_NNNNN]
data_type = "string"
dimension = true
levels = ["Level 1", "Level 2"]
In levels settings, define the number of levels that are used in the multi-level cascading select custom field configuration (you can use custom level names instead of "Level 1", "Level 2"). Level names should be unique and it should cover the maximum depth of the custom field context. For example, if your custom field has values split into 5 levels, you would need to define up to Level 5.
In addition, the following option can be added if the (none) member should be created at all parent levels. By default, this option is set to false and only one (none) member is created at the first highest level.
none_member_all_levels = true
Create CSV dimension from multi-choice custom field
You can create an additional CSV dimension where dimension members are applied combinations as comma-separated strings.
[jira.customfield_NNNNN]
csv_dimension = true
For example, you have a custom label type custom field. Usually, those values are not related, and each issue may have several custom labels. To group or filter issues by specific custom label combinations, you might need an additional dimension representing label combinations from those Jira issues.
Interval dimension
You can import a numeric custom field as an interval dimension. For example, if you would like to import the "Story Points" dimension that groups issues by story points intervals, then add the following advanced settings (where NNNNN is the Story points custom field ID) :
[jira.customfield_NNNNN]
dimension = true
intervals = "/5"
The above specifies that the "Story Points" custom field should be imported as an interval dimension and should group Story point values in the intervals or ranges of 5. This is the default interval, after import, it can be edited from "All Hierarchy level members" in the new Story Points dimension.
Import Epic name as a dimension
If a text type custom field could be used for grouping data, you can import this custom field as a dimension and also pass its value down to the issue hierarchy.
A good example is an Epic Name that is assigned only to epic issues but is quite handy to group data and aggregate metrics in reports. Add parameter dimension to enable dimension creation and parameter update_from_issue_key to pass down the epic name to issues down the hierarchy.
[jira.customfield_NNNNN]
data_type = "string"
dimension = true
update_from_issue_key = "epic_key"
Import changes of custom field dimensions
By default, you can enable changes of the standard Transition Status and Assignee dimensions as well as the changes of the Jira Agile Sprint dimension to be imported. See the documentation on how to enable and use Issues history and other measures that can be used to get the historical issue status.
Option 'Import issue change history' should be enabled prior to enabling value change import for any custom field dimension.
It is possible to import changes also of other single value custom field dimensions. Please add additional separate_table and changes advanced settings for these custom fields:
[jira.customfield_NNNNN]
data_type = "string"
dimension = true
separate_table = true
changes = true
Here you can't rename the field using name = "new name"as the change history would not work as expected for renamed fields.
When settings are saved, go to eazyBI import options, tab Custom fields, and select Import as dimension and Import value changes option for this custom field. After the import, you can use the Issues history measure with this dimension and Time dimension to see how many issues had the historical custom field value at the end of the corresponding Time period. Or use hidden Transitions to measure to analyze transitions and see the historical value of this custom field at the time when the transition was performed.
Please import value changes only for the custom field dimensions where it is really necessary. Import of each additional custom field dimension value change increases the size of the eazyBI database.
Value change import of scripted custom fields (i.e. Jira Misc, ScriptRunner scripted custom fields) is not available in eazyBI because value changes of those custom fields are not represented in issues history.
Import changelog string value
Some additional custom field types store just an ID of the selected value and then use additional lookup functionality to show a display value that corresponds to this ID value. If you have added such a custom field in the advanced settings and after the import, in the eazyBI, you see just an ID value, then this could be the cause for that. In this case please check in the Jira issue page History tab if you see the display value of this custom field when the change is made. If yes, then add get_changelog_string option in the advanced settings and re-import this custom field in eazyBI and now the custom field display values should be imported in eazyBI.
[jira.customfield_NNNNN]
data_type = "string"
dimension = true
get_changelog_string = true
Troubleshooting
Whenever you change the advanced settings for a custom field, it is recommended to perform double data import for the field to ensure the correct outcome of changes.
First, run the import with the custom field un-checked to clear the previously loaded custom field configuration. The second time, run the import with the custom field checked to load it again.
List of all settings
Go to the list of all available custom field advanced settings for more details and examples

